User Grouping methods #
In ScholarLMS there are two ways you can group users:
- Cohorts: Users grouped at site-wide or category levels are called Cohorts. These Cohorts allow site admin to use them for course bulk enrollment. Cohorts have no existence within a course.
- Groups: Groups are clusters of users tied together for collaborative activities within a course. These groups allow instructors to organize students for group assignments, discussions, and other collaborative tasks. Groups have no existence outside of a course.
Groups and Groupings #
- Groups — As explained above, they are collection of users tied together as user groups.
- Groupings — Groupings, on the other hand, are collections of user groups within a course.
Creating a group #
To create a group in a course:
-
- Navigate to your course.
- Click Participants. Change the drop-down menu at the top from Enrolled Users to Groups.
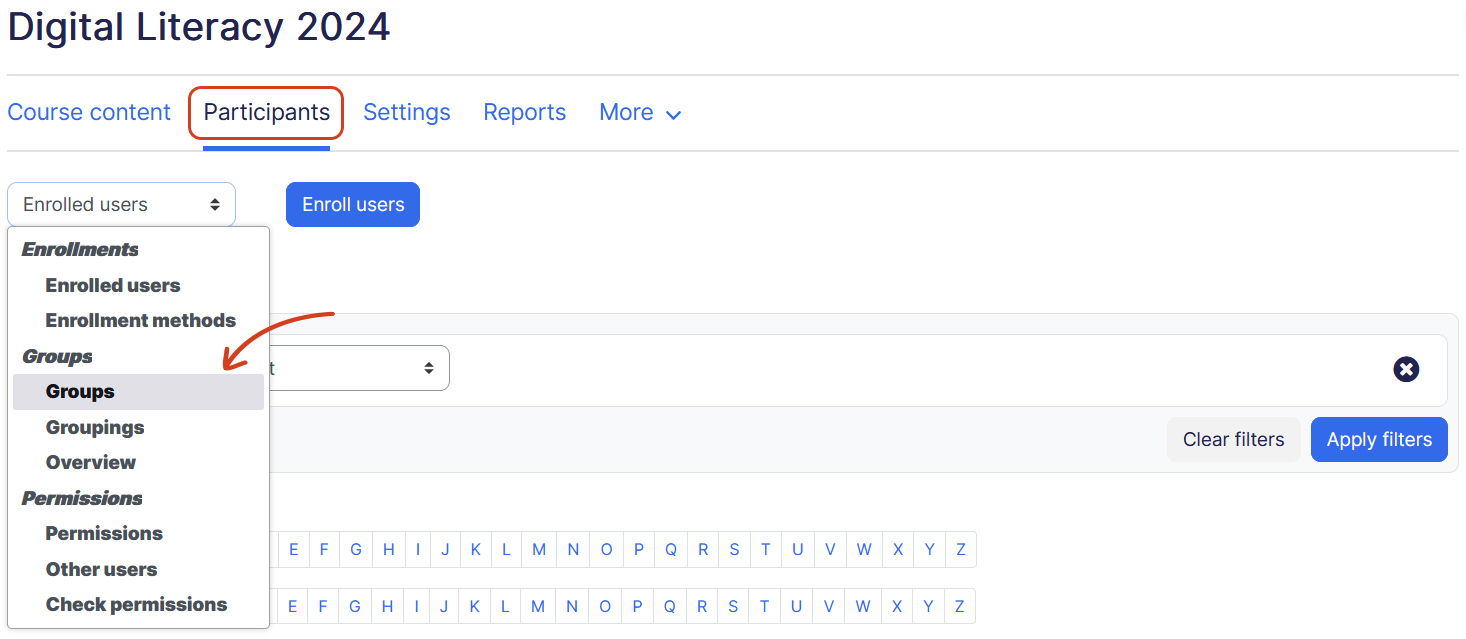
- On Groups page, click on ‘Create group‘ button at the bottom part of the page.
- This opens the ‘create new group’ page:
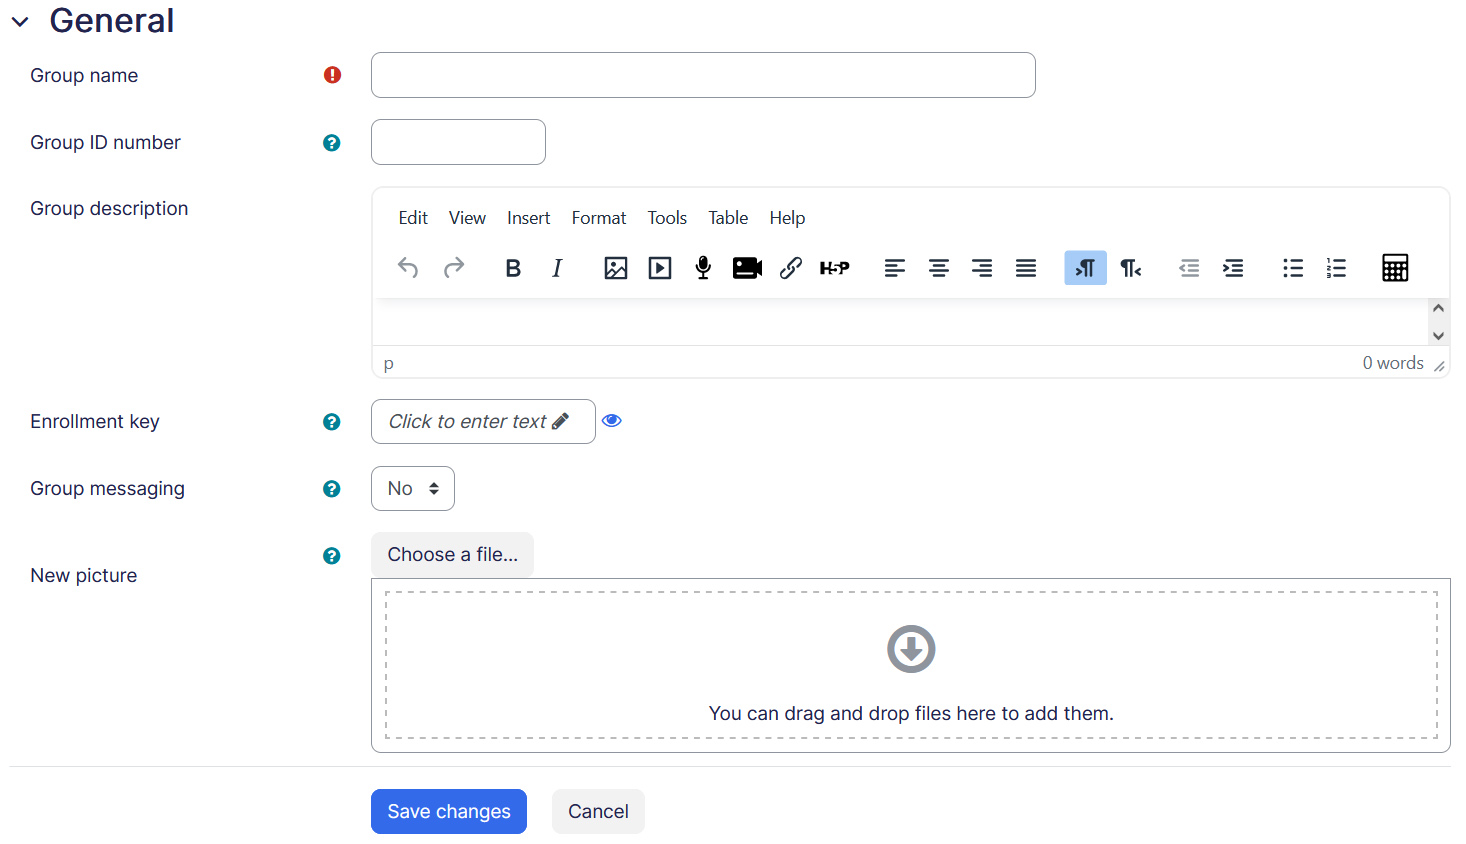
- Group name — Name the group here.
- Group ID number — The ID number of a group is only used when matching the group against external systems and is not displayed anywhere on the site. If the group has an official code name it may be entered, otherwise the field can be left blank.
- Group description — Add description for your internal use.
- Enrollment key — An enrollment key enables access to the course to be restricted to only those who know the key. If a group enrollment key is specified, then not only will entering that key let the user into the course, but it will also automatically make them a member of this group. Note: Group enrollment keys must be enabled in the Self Enrollment settings and an enrollment key for the course must also be specified.
- Group messaging — If enabled, group members can send messages to the others in their group via the messaging drawer.
- New picture — Add a group image.
- Once done, click on Save changes button.
Adding users to groups #
To add or remove groups members:
- On the groups page, click on the group name you would like to add users, then click Add/Remove users button.
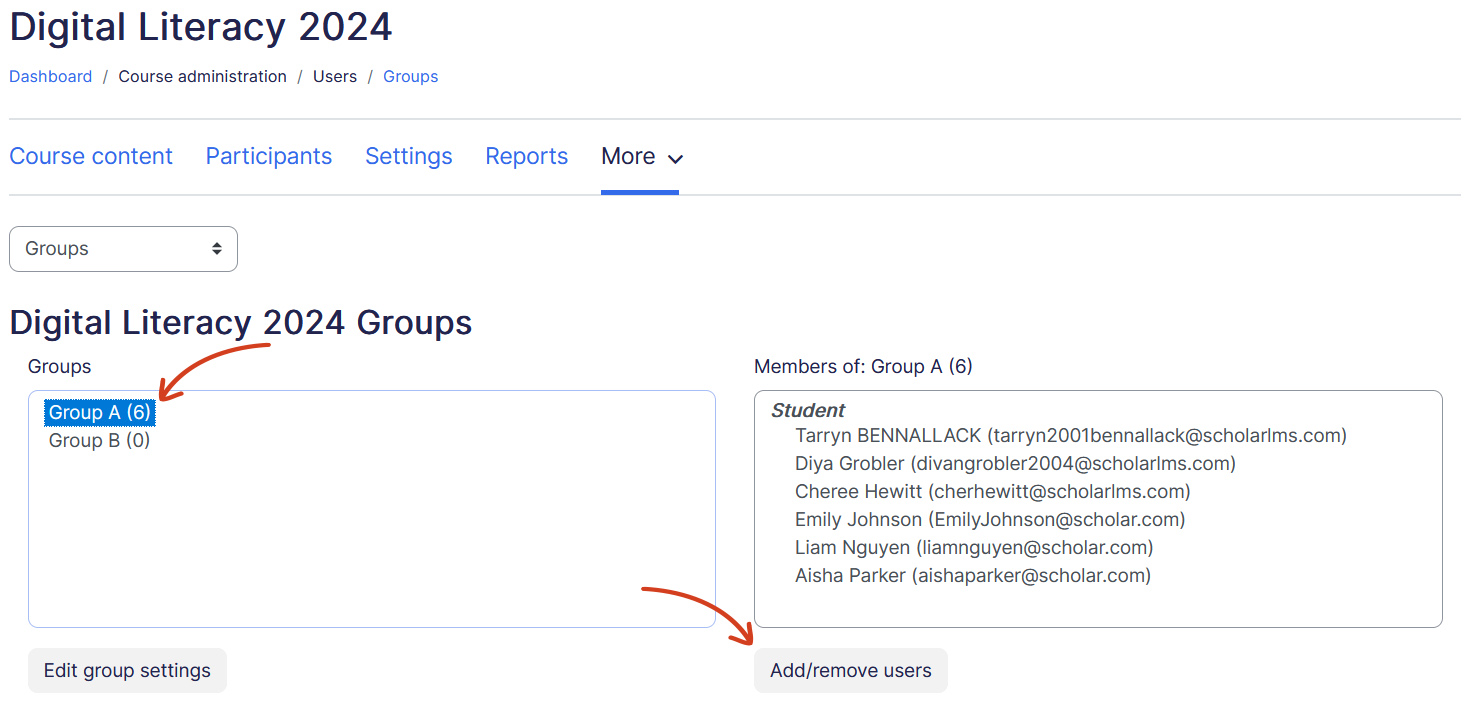
- On the add/remove users page, click to select desired user then click Add button to add to group.
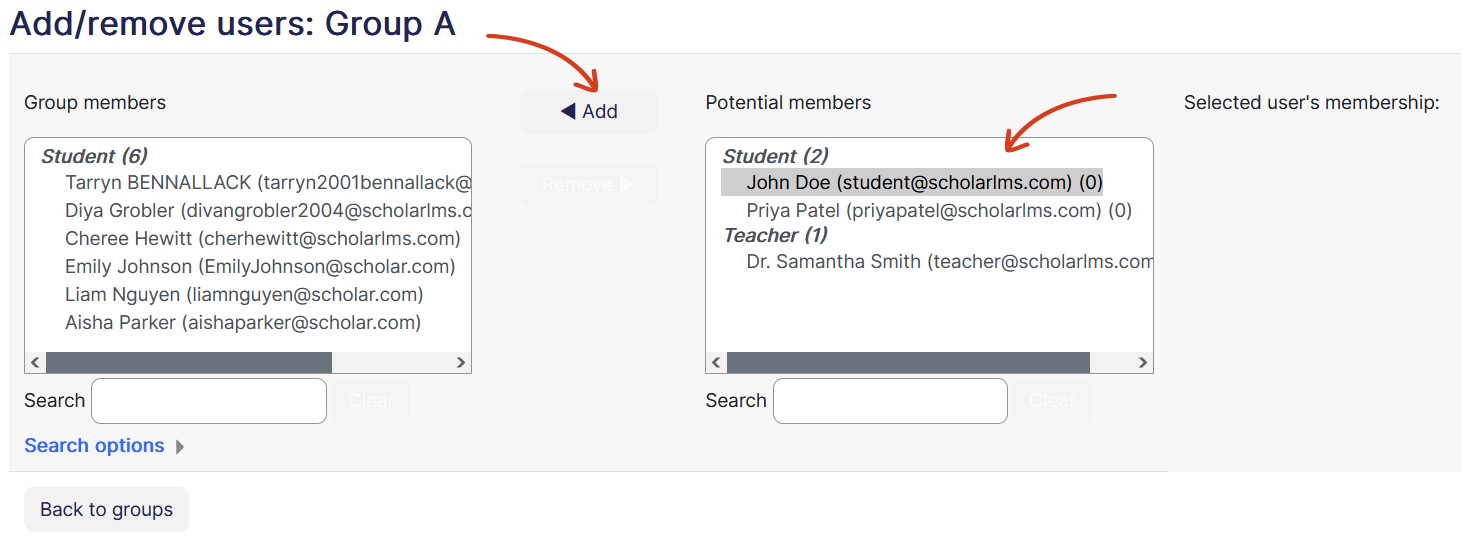
- Once done, click on Back to groups button.
Bulk import groups #
Groups can be created in bulk by uploading a CSV file. To bulk import groups:
- Prepare the CSV with groupname which is the required data, all other data ‘description’, ‘groupidnumber’ and ‘enrolmentkey’ is optional. A preview of the CSV look like the below screenshot.

- Once CSV is prepared, navigate to your course.
- Click Participants. Change the drop-down menu at the top from Enrolled Users to Groups.
- On Groups page, click on ‘Import group‘ button at the bottom part of the page.
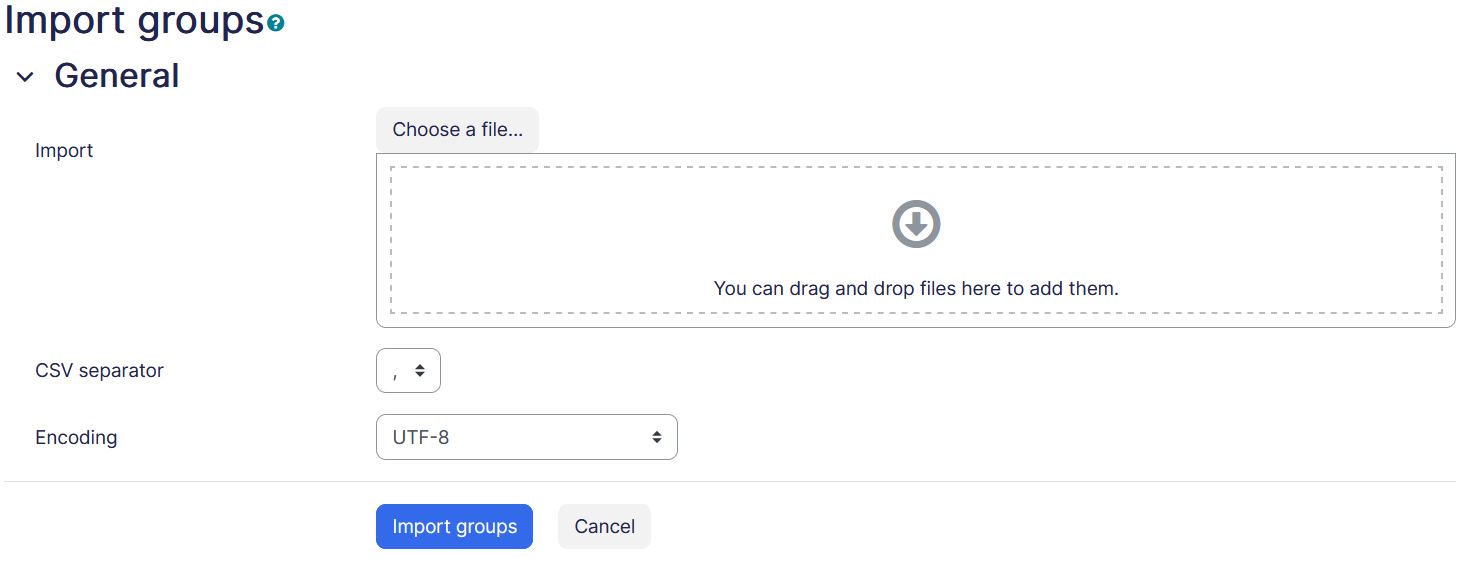
- This opens the ‘Import group‘ page, upload the CSV file and click on ‘Import groups‘ button.
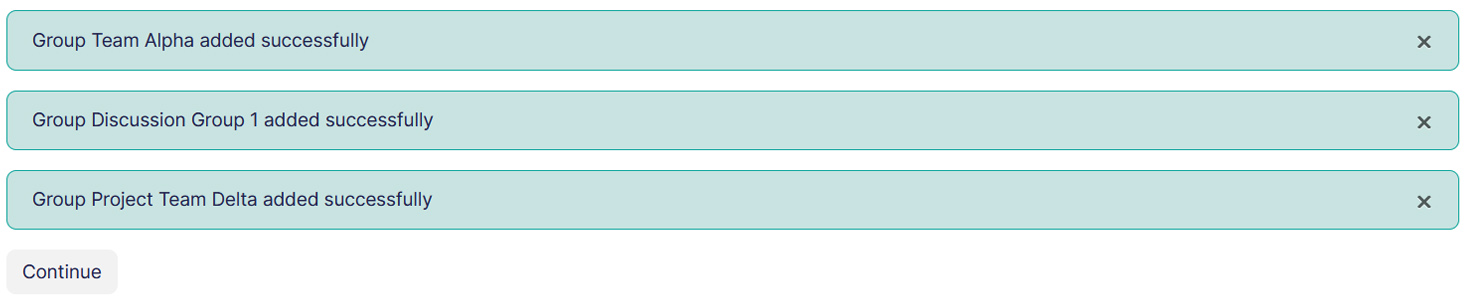
- Once uploaded, you get a success message about created groups.
Groups overview #
To explore overview of groups and groupings available in a course:
- Navigate to your course.
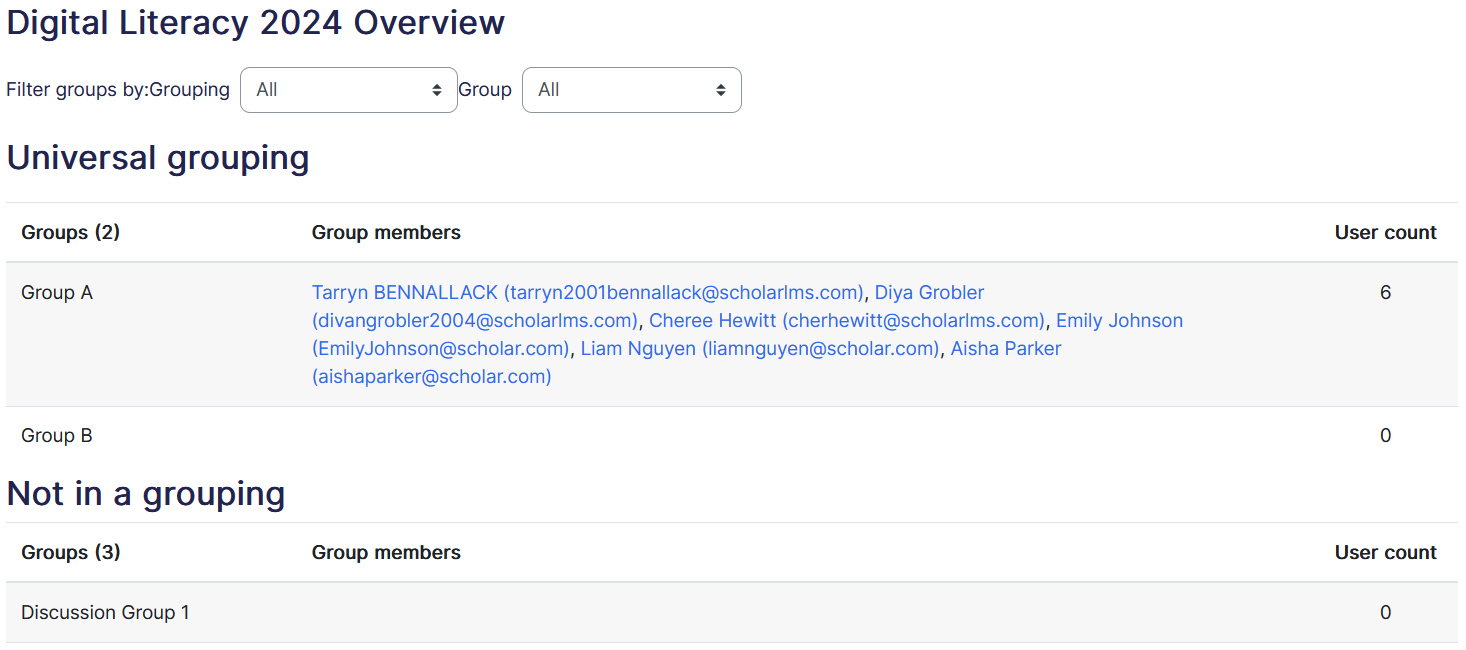
- Click Participants. Change the drop-down menu at the top from Enrolled Users to Overview.
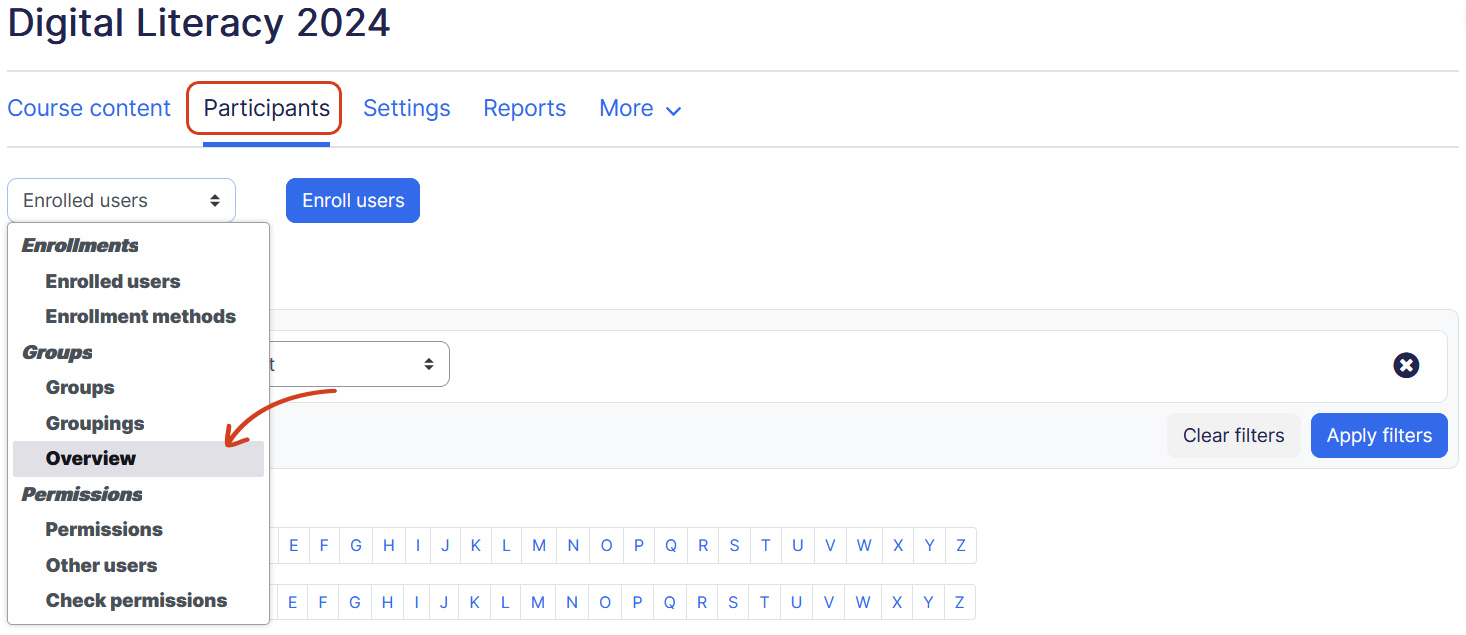
- The overview page shows user filtered by Universal grouping, Not in a grouping, and Not in a group.
Course group modes #
Once you have setup groups and users it’s time to setup course group mode. The group mode defined at course level is the default mode for all activities within the course. Each activity that supports groups can also define its own group mode, though if the group mode is forced at course level, the group mode setting for each activity is ignored.
There are three group modes available in course setting:
- No groups — No group mode followed.
- Separate groups — Each group can only see their own group members, others are invisible.
- Visible groups — Each group member works in their own group, but can also see other groups.
To setup course group mode:
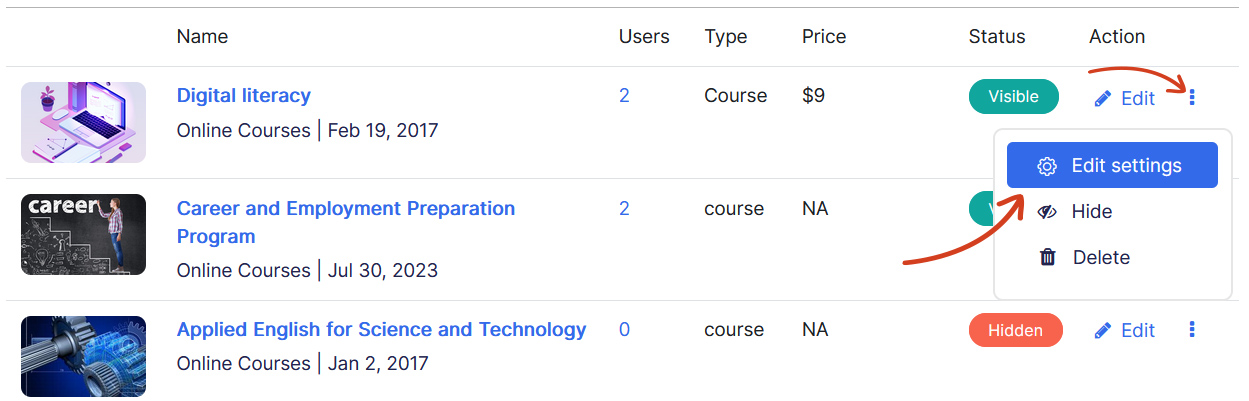
- Navigate to the Courses page.
- Locate the desired course and click on the three dots->Edit Settings icon under Actions.
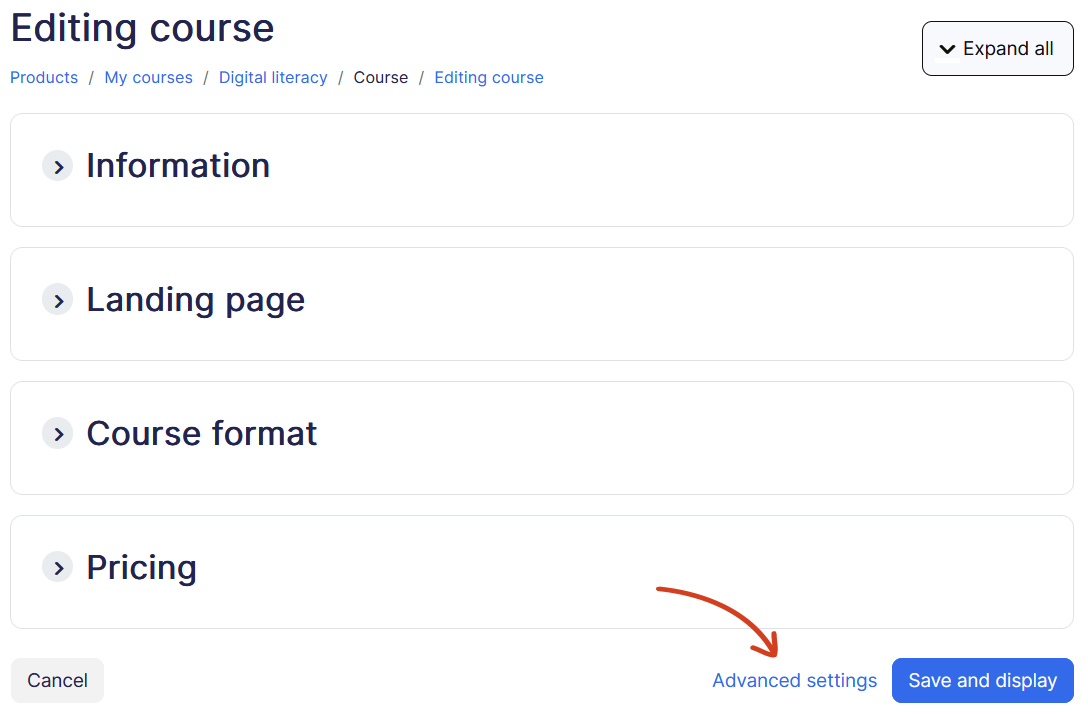
- Then click on Advanced settings from the Course Settings page
- Scroll to Groups tab.
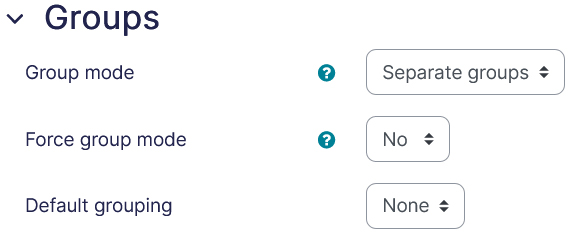
- Group mode — Choose the group mode. Read above to know more about visible and separate group modes.
- Force group mode — If group mode is forced, then the course group mode is applied to every activity in the course. Group mode settings in each activity are then ignored.
- Default grouping — Choose grouping. Read first part of this help guide to know more about Groups and Groupings.
- Once done, Save and display button.
Restricting course element to a particular group #
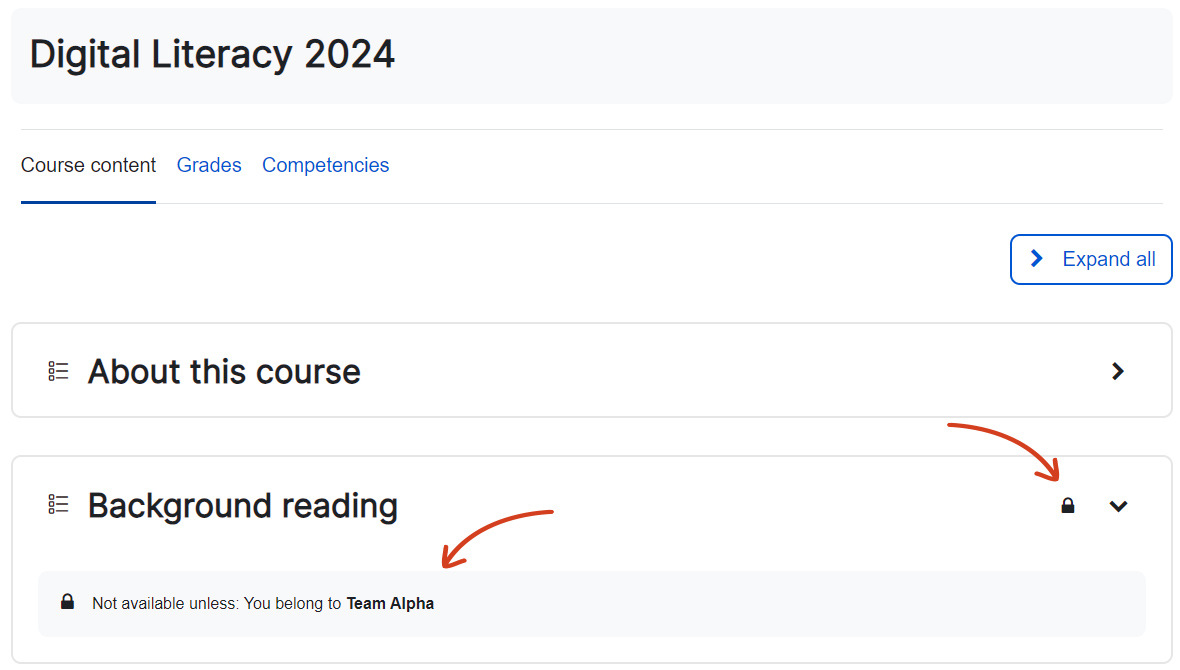
The access to a course content can be restricted based on users’ group. To restrict access of course content like course sections, activities, resources, read our help guide on access restriction.
Cohorts #
Cohorts are site-wide or course category-wide groups. The purpose of Cohorts is to bulk enroll users in a course either by Cohort enrollment or Cohort sync enrollment method.
Creating a cohort #
To create a cohort:
- Navigate to Users -> Cohorts page from left navigation, then click on Add new cohort tab.
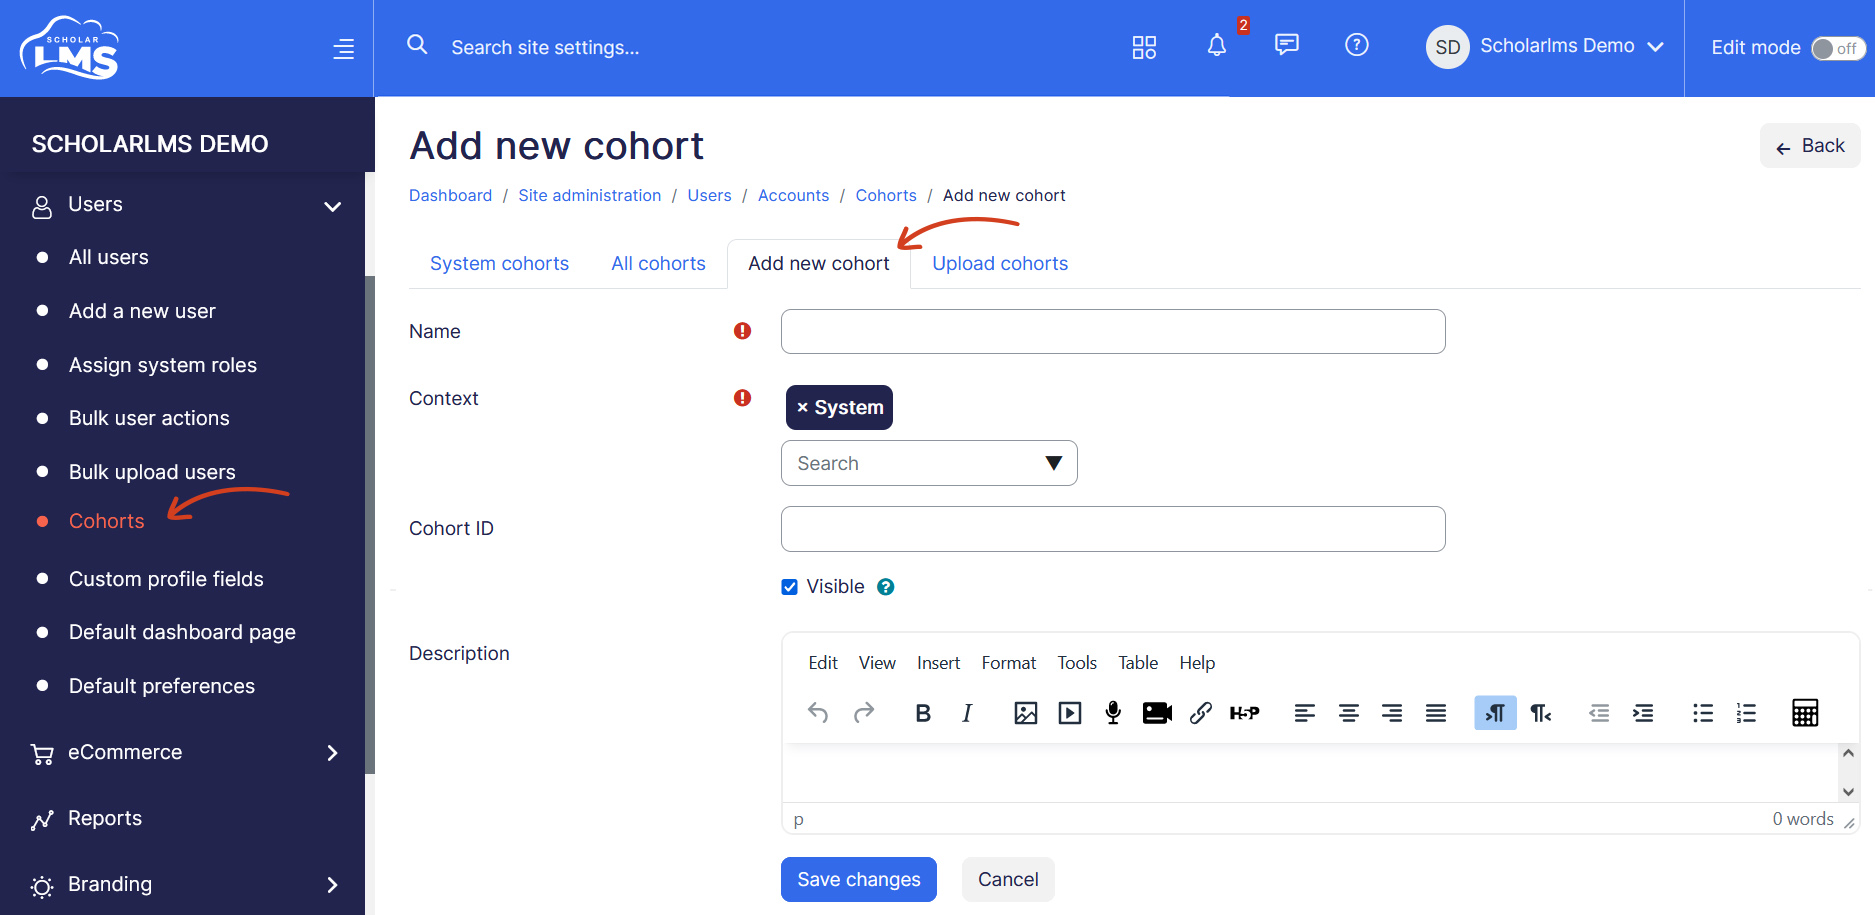
- Fill details on Add new cohort page:
- Name — Give this cohort a name.
- Context — Define context of the cohort if it’s available at site level or category level.
- Cohort ID — Give this cohort and ID which is unique.
- Visibility — Turn of visibility if you do not want teachers to see this cohort.
- Description — Add description that could be useful for your staff.
- Once done, click Save changes to create the cohort.
Cohort actions #
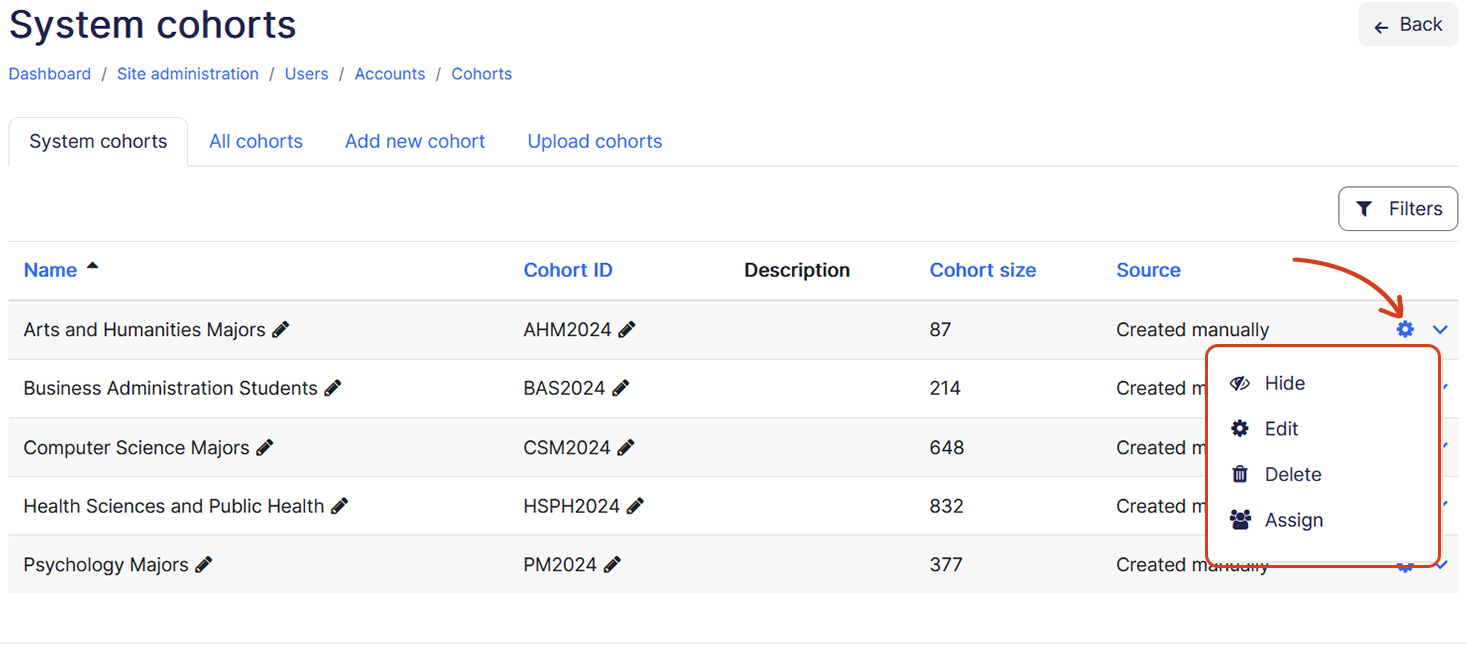
You can take four actions on a cohort which are:
- Hide — Allows you to hide a cohort. Hiding a cohort won’t affect enrolled uses from Cohort sync method.
- Edit — Takes you to Edit cohort page where you can edit cohort’s details.
- Delete — Deletes the Cohort.
- Assign — Takes to ‘Assign cohort members’ page.
Warning: Deleting a cohort that is used in a course as a Cohort sync method will automatically delete user enrollments associated with that cohort in the course. This cannot be undone.
Creating Cohorts in bulk #
Cohorts can be created in bulk with a CSV file. To create Cohorts in bulk:
- Prepare the CSV with name (required), idnumber, description, category all other data is optional. A preview of the CSV look like the below screenshot. This sample CSV will create two Cohorts one named as ‘Digital Skills Workshop Participants’ and another named as ‘Political Science Majors’.

- Once CSV is prepared with data, navigate to Upload Cohorts tab
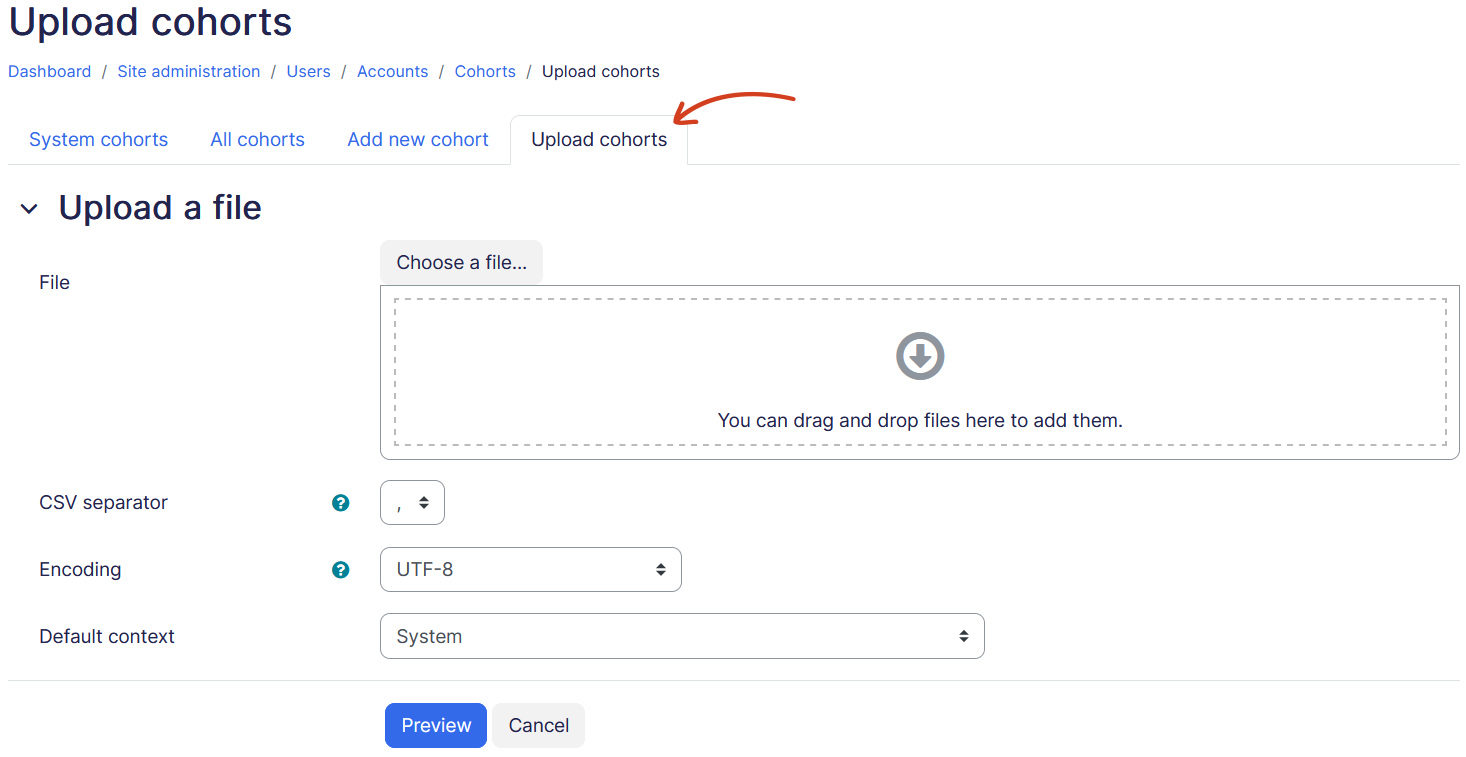
- After CSV is uploaded click Preview button. This takes to preview page showing the Cohorts being created with any warnings.
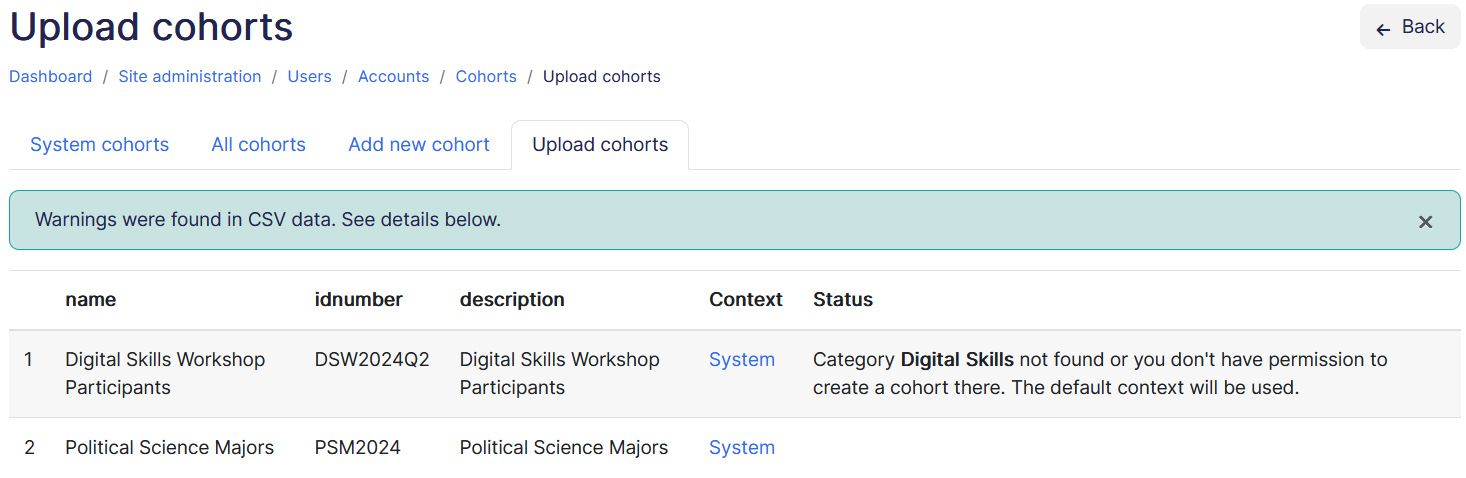
- If the preview looks good, go ahead to upload Cohorts, else revert back with correct data and repeat the upload process.
Adding users to a cohort #
Option 1 — Add users to a cohort from the Assign action on a cohort. This allows you to select one or more users to assign to a cohort.
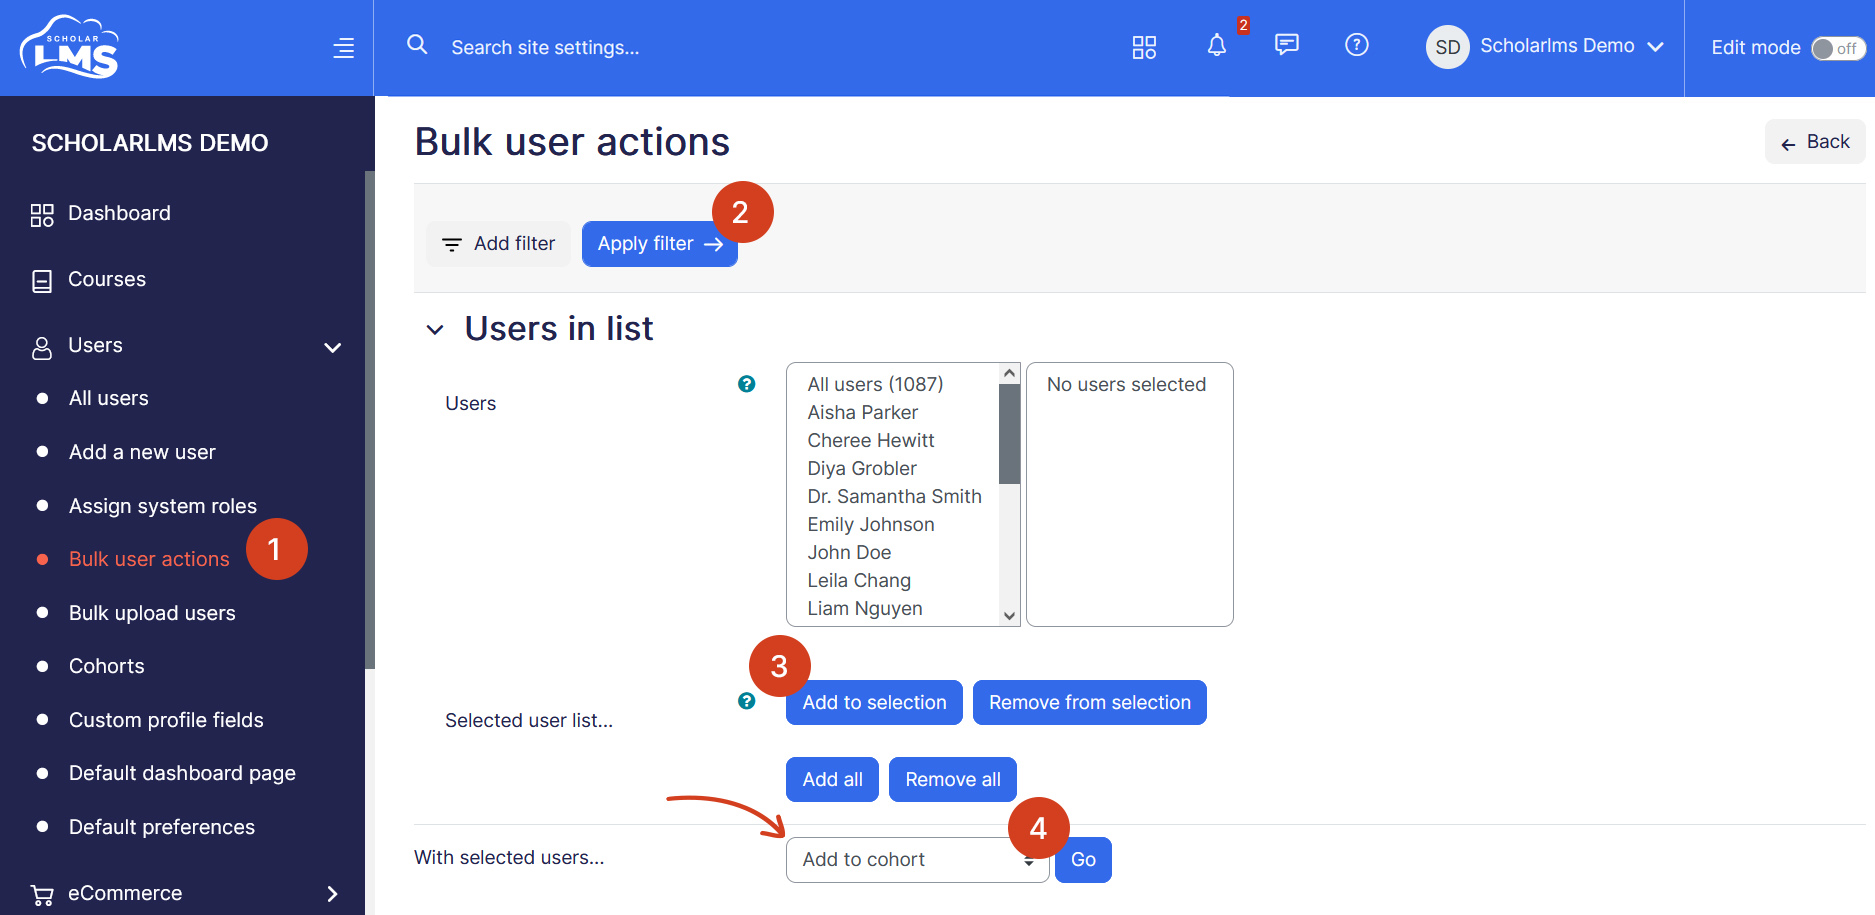
Option 2 — You can add users to a cohort from Bulk users actions.
- Navigate to Bulk user actions,
- Find users by setting an appropriate filter,
- Add users from the available list to the selected list,
- Choose ‘Add to cohort’ with selected users.
Option 3 — Add users to cohort through bulk upload users feature.
Adding a cohort to a course #
There are two ways to add cohort members to a course:
- Manually enroll user — Cohort members can be enrolled to a course by using Manual course enrollment feature. This method is used if course enrollment should be independent from Cohort. Even if the user is removed from Cohort, their course enrollment won’t be affected as they are not synced with Cohort.
- Cohort Sync — Another way to enroll cohort in a course is through Cohort sync method. Cohort Sync method automatically enrolls members of a cohort in a course. If a user is added or removed from the cohort, they are automatically enrolled or unenrolled, respectively.