
- Adding 'Access Restriction'
- Restrict access by 'Activity Completion'
- Restrict access by 'Course Credit Payment'
- Restrict access by 'Date'
- Restrict access by 'Days after completion'
- Restrict access by 'Group'
- Restrict access by 'Time Spent'
- Restrict access by 'User Profile Field'
- Restrict access by 'Grade'
- Restrict access using a 'Nested Restriction Set'
- Hide restriction information from students
The Access Restriction feature enables course creators with the ability to control the availability of course sections, activities, or any course element based on certain conditions such as completion of another activity, grade, date, a field in the user profile, minimum time spent in the course, or a separate set of nested restrictions. It allows gamification of courses and provides a way to guide students through a course in a specified order.
Using conditional availability of a Course Element depends on two settings that work together: Restrict access and Activity completion.
Adding ‘Access Restriction’ #
To add Access Restriction:
- Navigate to the Courses page.
- Click on “Edit” under Actions for the desired course.
- This takes to Course Builder page. Ensure that the Edit mode is activated on the Course Builder page.

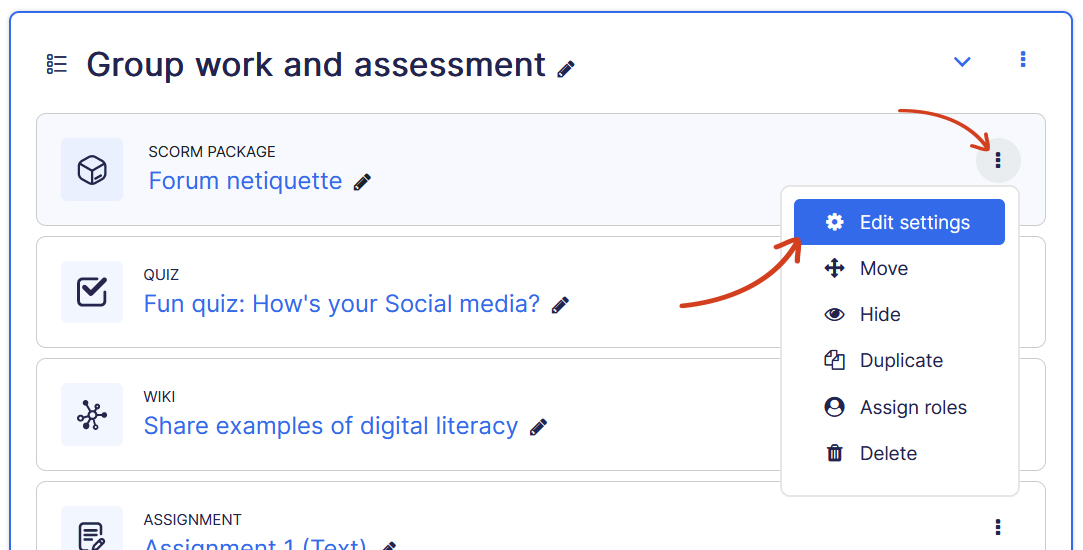
- Navigate to the Course Section or Activity you wish to add Access Restriction, then click on the three dots icon to open more options, and click “Edit Settings” which opens the settings page.
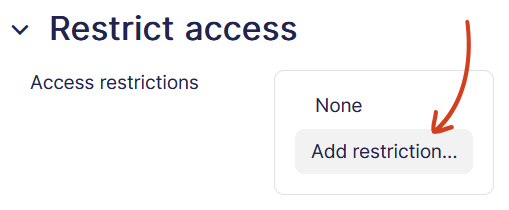
- This opens the settings page. Navigate to the “Restrict Access” tab. Click on the “Add restriction” button to add conditions.
- This opens a modal box with several restriction options that you can apply to the course section or activity.
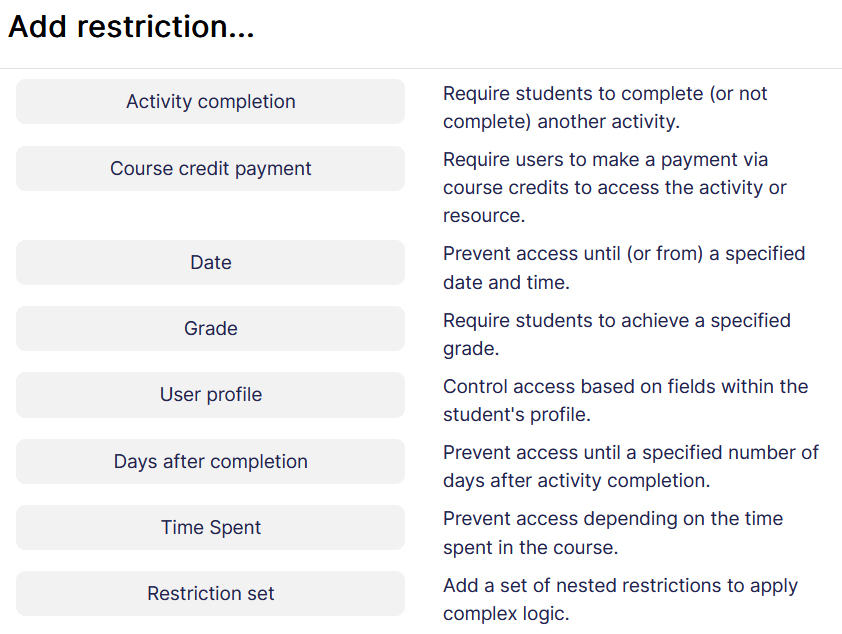
There can be more or less Access Restriction options on your site based on the pricing plan you are subscribed.
Restrict access by ‘Activity Completion’ #
Course Completion condition requires a student to complete another activity before this one is made available. It is available when you have used Activity completion on a course element in this course.
To add Activity Completion restriction:
- Follow the steps to ‘add a restriction‘ above.
- Add Activity Completion
- Choose Must from the drop-down (i.e. that the student must have completed the activity).
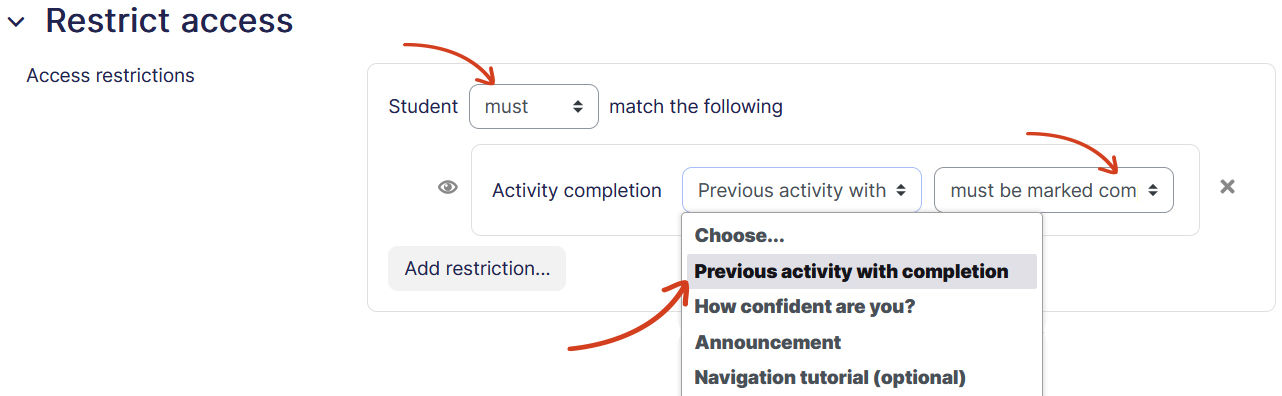
- Use the drop-down boxes to:
- Select the activity that must be completed – this will show all activities of the course that have activity completion enabled. Or simply choose “Previous activity with completion” to automatically select previous activity which has completion condition.
- Select must be marked complete or must be complete with pass grade if appropriate.
- Click Save and display.
Restrict access by ‘Course Credit Payment’ #
Course Credit Payment requires a student to pay required Credits from their Credit balance to access this activity. This restriction is available if Credit system is enabled in your LMS site.
To add Course Credit Payment restriction:
- Follow the steps to ‘add a restriction‘ above.
- Add Course Credit Payment
- Choose Must from the drop-down
- Insert the number of Credits this activity is worth to access it.
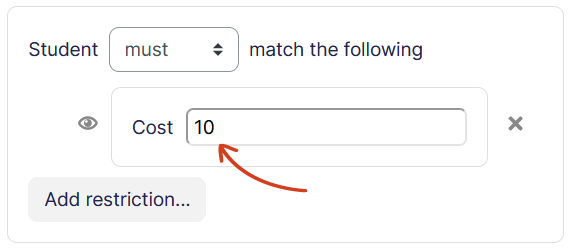
- Click Save and display.
Restrict access by ‘Date’ #
Restricting access by date enables you to make a course section or activity available after a defined date, which is useful for releasing published course content on a specific date and time like so called Drip-feeding.
To add restrict access by date:
- Follow the steps to ‘add a restriction‘ above.
- Add Course Credit Payment
- Choose Must from the drop-down
- From Date dropdown, choose either From to open this content after a specific date. Alternatively, use Until to make this content unavailable after a specific date.
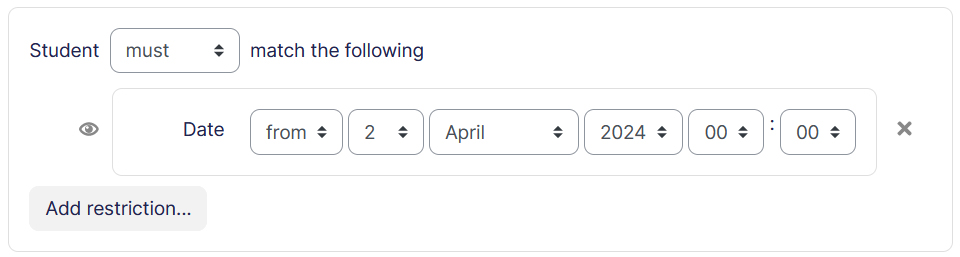
- You can use two Date conditions one with From and another with Until to make this content available between a specific time period.
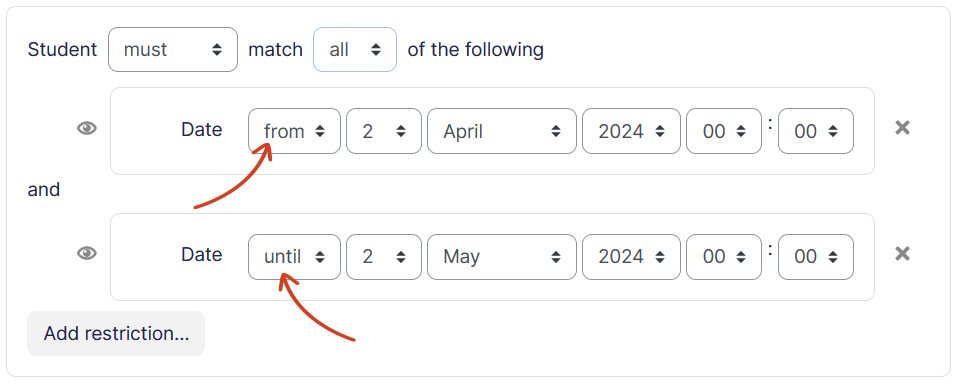
- Once done, click Save and display.
In most of the cases, Date restriction is used to prevent students from viewing an entire course section. You do not need to restrict access by date for most course elements like Assignments as they have open and close/due dates already in the settings that prevent students from accessing too early or too late.
Restrict access by ‘Days after completion’ #
The “Days after Completion” restriction condition allows content to become available after a specified number of days following the completion of another activity or course element. This is another way to gamify course content as the completion is based on another activity.
To add restrict access by Days after Completion:
- Follow the steps to ‘add a restriction‘ above.
- Add Course Credit Payment
- Choose Must from the drop-down
- Insert number of days, and use the drop-down boxes to:
- Select the activity that must be completed – this will show all activities of the course that have activity completion enabled.
- Select marked complete or marked complete with pass grade if appropriate.
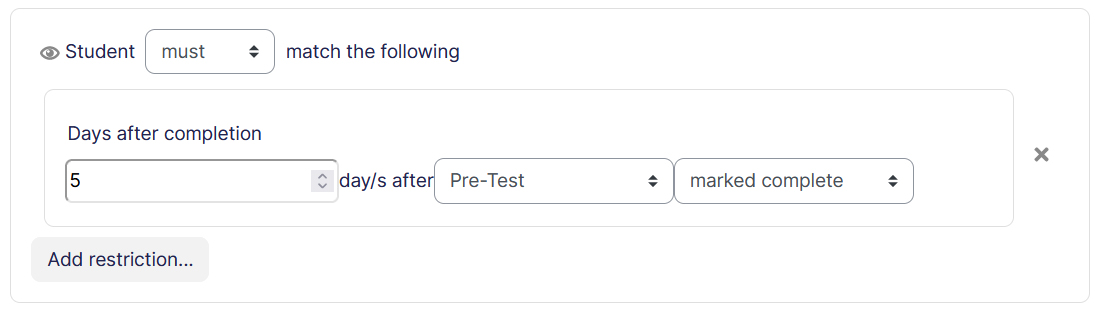
- Once done, click Save and display.
Restrict access by ‘Group’ #
You might want to restrict access to items to certain groups. For example, if you have a group project you might want to provide different resources for the different groups.
The “Group restriction” option is accessible only when the course has the Group mode enabled and contains at least one group.
To add restrict access by Group:
- Follow the steps to ‘add a restriction‘ above.
- Add Group
- Choose Must from the drop-down
- From Group dropdown, choose a group
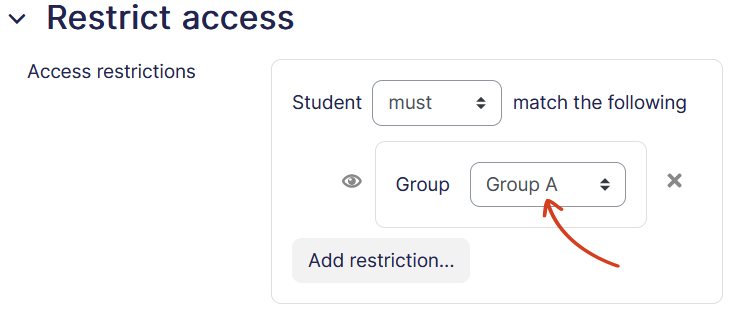
- Once done, click Save and display.
You do not need to restrict access by group for most activities like Assignment or Forum as they allow for all groups to submit/interact within the one activity. However, there might be times when you want students in different groups to take different quizzes or fill out different surveys.
Restrict access by ‘Time Spent’ #
The “Time Spent” restriction enables course creators to limit the availability of course content based on the amount of time spent by learners within the course. Time Spent restriction is useful to ensure that learners spend sufficient time studying the course material before attempting assessments or exams. e.g. Compliance Training, Certification Courses, or Continuing Education.
To add restrict access by Group:
- Follow the steps to ‘add a restriction‘ above.
- Add Group
- Choose Must from the drop-down
- From dropdown, choose hours or minutes, and insert number of hours or minutes student must spent to access this content.
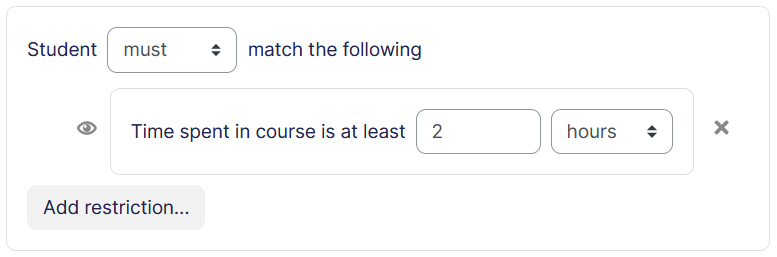
- Once done, click Save and display.
Restrict access by ‘User Profile Field’ #
Restrict access by user profile fields allows course creators to control access to course content based on user’s identity stored in the user’s profile. This can be applies on pre-defined user fields or custom fields both.
To add restrict access by Group:
- Follow the steps to ‘add a restriction‘ above.
- Add Group
- Choose Must from the drop-down
- From dropdown, choose profile field and other conditions
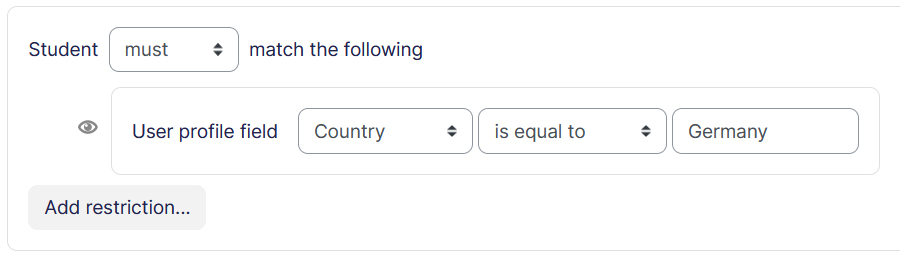
- Once done, click Save and display.
Restrict access by ‘Grade’ #
You can require students achieve a specified grade for any graded activity or for the overall course grade to view Course Content.
To add restrict access by Grades:
- Follow the steps to ‘add a restriction‘ above.
- Add Grade
- Choose Must from the drop-down
- From Grade dropdown choose either a graded activity, or Course grade. You can enter either a minimum value (at least percentage), a maximum value (less than percentage), both, or neither by selecting the relevant checkbox.
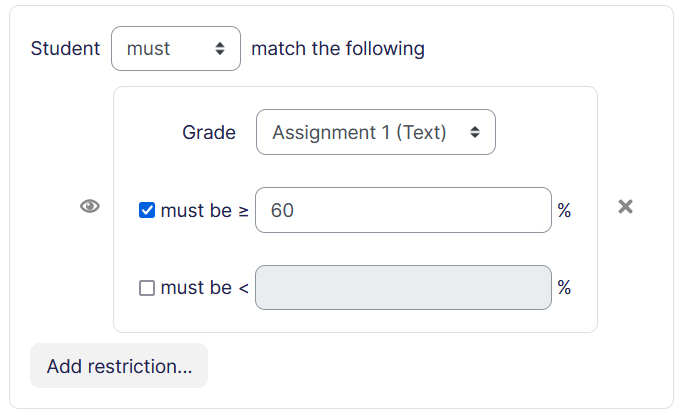
- Once done, click Save and display.
Restrict access using a ‘Nested Restriction Set’ #
This Restriction set allows you to add a set of nested restrictions combining the use of the above conditions in order to achieve a more complex logic.
To add restriction set:
- Follow the steps to ‘add a restriction‘ above.
- Add Restriction Set
- Choose Must from the Student drop-down and Any from match dropdown.
- Now add restriction like we learned above in this guide.
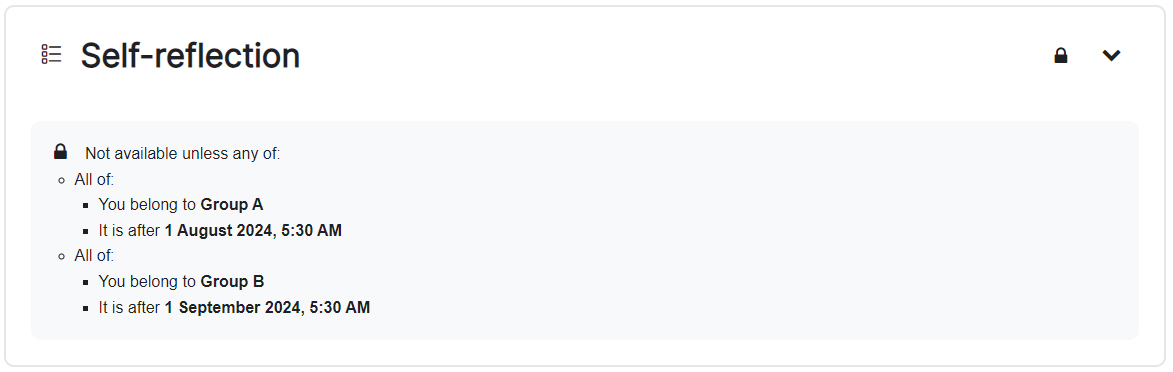
- Create set of restrictions. For example the below set allows student to view a course section based on their group and date of access.
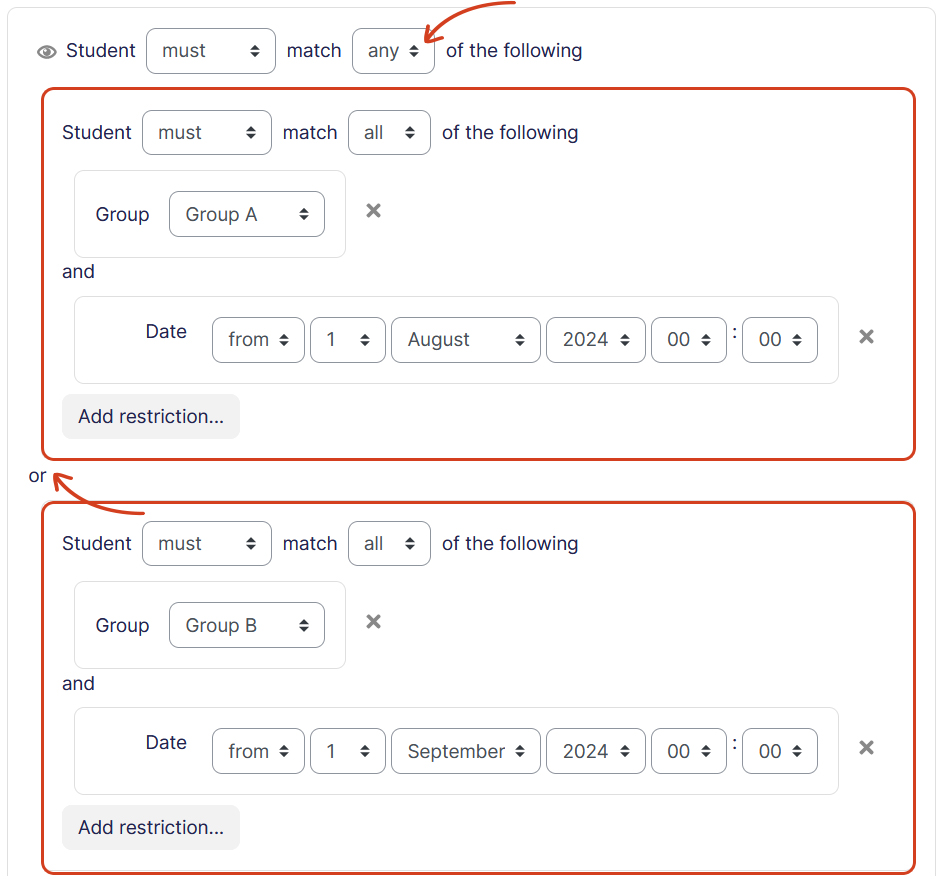
- Once done, click Save and display.
- This is how a student will see this restriction set.
Hide restriction information from students #
The eye icon to the left of each restriction can be toggled between the hidden and visible state for each restriction. In the event of a conflict, the shut eye always takes preference and the activity or section will not be visible to the student.
- If the eye is SHUT then students who do not meet that part of the condition will not see the activity.
- If the eye is OPEN the students who do not meet that part of the condition will see the activity but it will be greyed out. They will have information about why they can’t access it yet.