
The course and activity Completion Tracking feature enables instructors to monitor students’ progress. Instructors achieve this by establishing completion criteria at the course level and for individual course elements such as activities and resources. Criteria may include viewing the activity, achieving a specific grade, meeting a minimum time requirement, or marking the activity as complete. This process involves two steps:
- Setting up Completion Tracking for course elements (activities and resources).
- Establishing course completion criteria.
Why defining course and activity Completion Tracking is important? #
Setting Completion Tracking helps to promote accountability, track progress, and enhance the learning experience for students in online courses. It serves several purposes in an educational environment such as:
- Tracking Progress: By setting course and activity completion, instructors can monitor and track the progress of students. This helps them understand how much of the course content has been covered by each student and identify any areas where students may be struggling.
- Feedback and Assessment: Completion Tracking can be used as a form of assessment or feedback mechanism. When learners complete activities and course is marked completed, it indicates their engagement with the material and allows instructors to provide feedback or grades based on their performance.
- Encouraging Engagement: Setting completion criteria encourages learners to actively engage with the course materials and participate in learning activities. It provides a clear goal for students to work towards and helps maintain their motivation throughout the course.
- Personalized Learning Paths: Completion criteria can be used to create personalized learning paths for individual students. By setting different completion requirements for different activities, instructors can tailor the learning experience to meet different goals.
Enabling Activity Completion Tracking #
To enable Completion Tracking for a course element like Activity or Resource:
- Navigate to the Courses page.
- Click on “Edit” under Actions for the desired course.
- This takes to Course Builder page. Ensure that the Edit mode is activated on the Course Builder page.

- Navigate to the Course Section or Activity you wish to add Access Restriction, then click on the three dots icon to open more options, and click “Edit Settings” which opens the settings page.
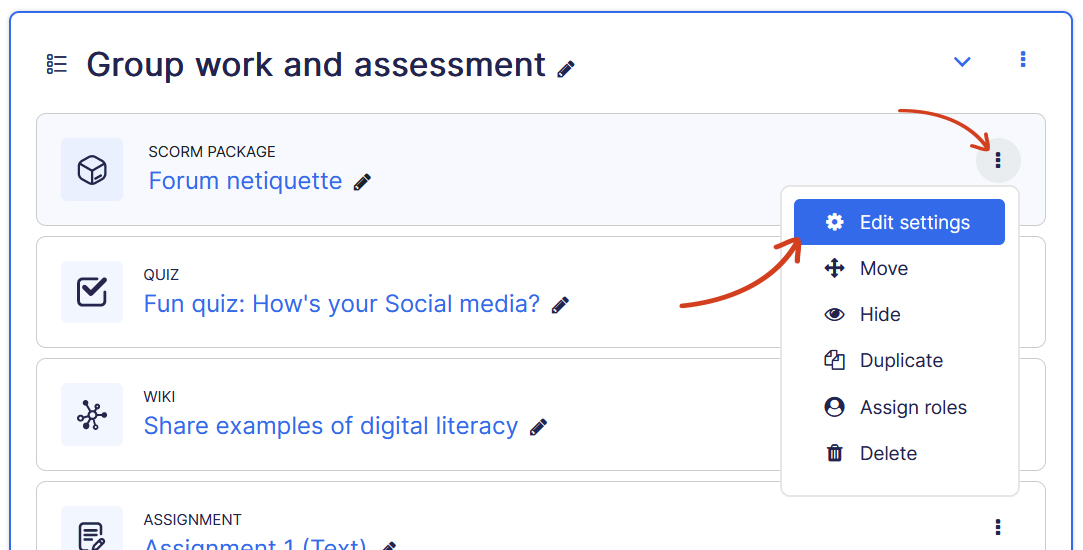
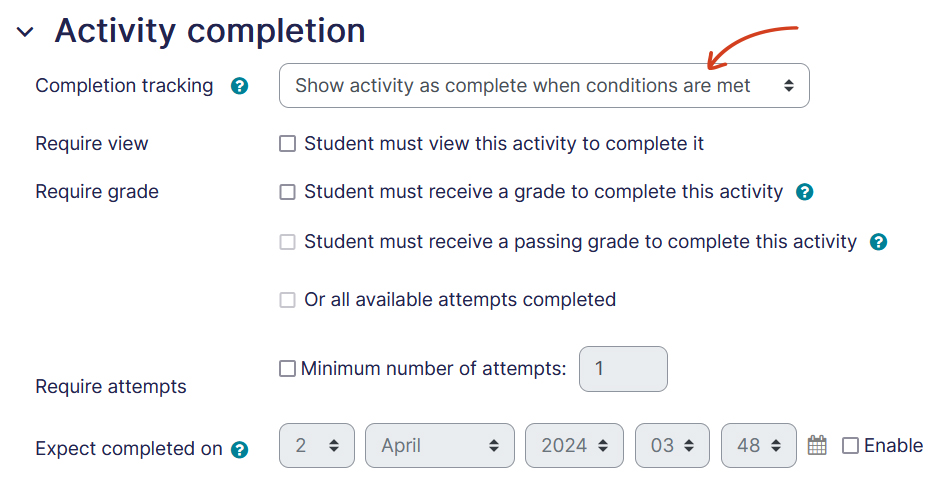
- This opens the activity settings page. Navigate to the “Activity completion” tab. Choose desired option from the Completion Tracking dropdown. Based on which activity you are, the Completion Tracking options could be different. Below is the available Completion Tracking options for Quiz activity.
- Once done, click Save and display.
If you don’t see the ‘Activity Completion’ tab, then course completion must be enabled from the course settings. For that explore Enabling Course Completion Tracking.
Completion Tracking Options #
Every course element offers two methods to track completion:
Method #1: Students can manually mark the activity as completed — In this method, students are provided with a ‘Mark as done‘ button to manually indicate when they have completed the activity. This option relies entirely on the discretion of the student to use it.
Method #2: Show activity as completed when conditions are met — Depending on the course element, instructors have additional options to automatically mark completion based on certain criteria.
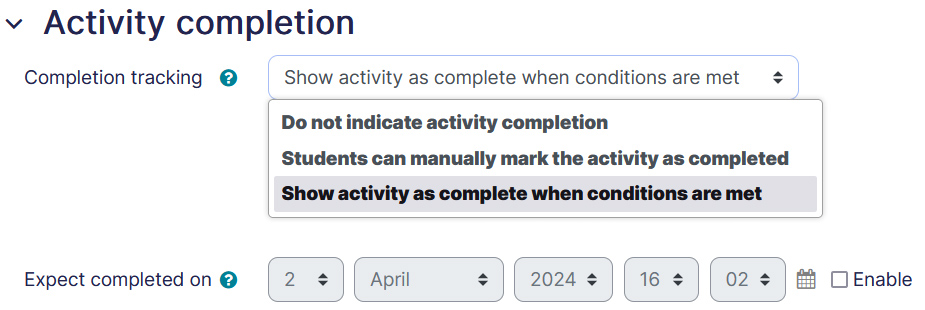
Expect completed on — This setting specifies the date when the activity is expected to be completed. When the date is upcoming, the activity is listed in the Timeline block on the Dashboard.
Completion Conditions #
Each activity has its own set of completion conditions that can be applied to it.
- Require view — Will require Student to view the activity to complete it.
- Require grade — Applicable to activities that can be graded. The activity is considered complete when a student receives a grade. It does not matter how well the student did. Getting any grade will mark the activity completed. Applicable to graded activities.
- Require passing grade — Applicable to activities that can be graded. A passing grade may be required for completion of a graded activity. This condition is used together with the Require grade requirement. Applicable to graded activities.
- Require minimum score (SCORM lesson) — Enabling this setting will require a user to have at least the minimum score entered to be marked complete in this SCORM activity, as well as any other Activity Completion requirements.
- Require status (SCORM lesson) — Passed or Completed. Checking one or more statuses will require a user to achieve at least one of the checked statuses in order to be marked complete in this SCORM activity, as well as any other Activity Completion requirements.
- Require all scos to return completion status (SCORM lesson) — Some SCORM packages contain multiple components or “scos” – when this is enabled all scos within the package must return the relevant lesson_status for this activity to be flagged complete.
- — Applicable to Assignment activity where student must make a submission to complete the activity.
- — Define the minimum number of attempts required to complete the Quiz activity.
- Require end reached (Lesson) — In order for the lesson to be marked complete, the student must go to the very last page of the lesson.
- Require time spent (Lesson) — In order for the lesson to be marked complete, the student must stay within the lesson pages for the time specified by the teacher here. The time can range from seconds to weeks. If they finish the lesson sooner, they will see an alert saying they did not reach the minimum time acceptable and may have to repeat the lesson.
Locked completion options #
If at least one person has completed an activity, completion options are ‘locked’. This is because changing these options may result in unexpected behaviour. For example, if somebody has ticked an activity as manually completed, and you then set it to automatic completion, the activity will become unticked – very confusing for the student who had already ticked it!

Warning: It is best not to unlock options unless you are sure it won’t cause problems – for example, if you know that students don’t have access to the course yet, so it will only be staff who have marked the activity completed when testing.
What happens when you unlock #
Once you unlock options and then click ‘Save changes’, all completion information for the activity will be deleted and, if possible, regenerated according to the new settings.
- If the new completion option is manual, everyone will be set to ‘not completed’ regardless of any previous setting.
- If it is automatic then, depending on the options chosen, the system may or may not be able to construct a correct current value for everyone.
- The ‘viewed’ requirement will not work – even if a student has viewed the activity before, it will not be marked completed until they view it again.
- Most other options will be recalculated successfully.
If you change completion options while a student is logged in, they may not see the changes for some minutes.
Course Completion Tracking #
Course completion allows you to set completion criteria for the entire course. The criteria can include completion of one or more activities; date; completion of another course and/or other requirements. When students meet the requirements, the course is marked complete. Progress towards completion can be seen in the course completion report, and the course completion status block.
To setup course Completion Tracking:
- Navigate to the desired course page.
- Click on Course Completion menu item under More tab.
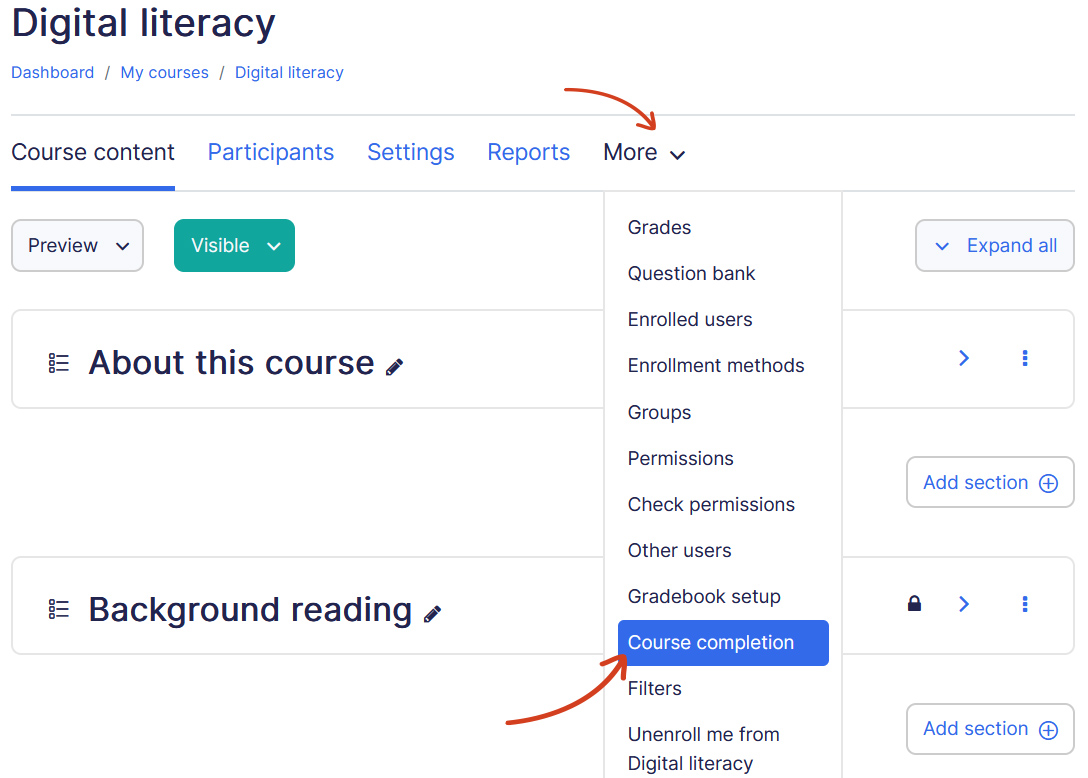
- Setup desired completion settings for the course.
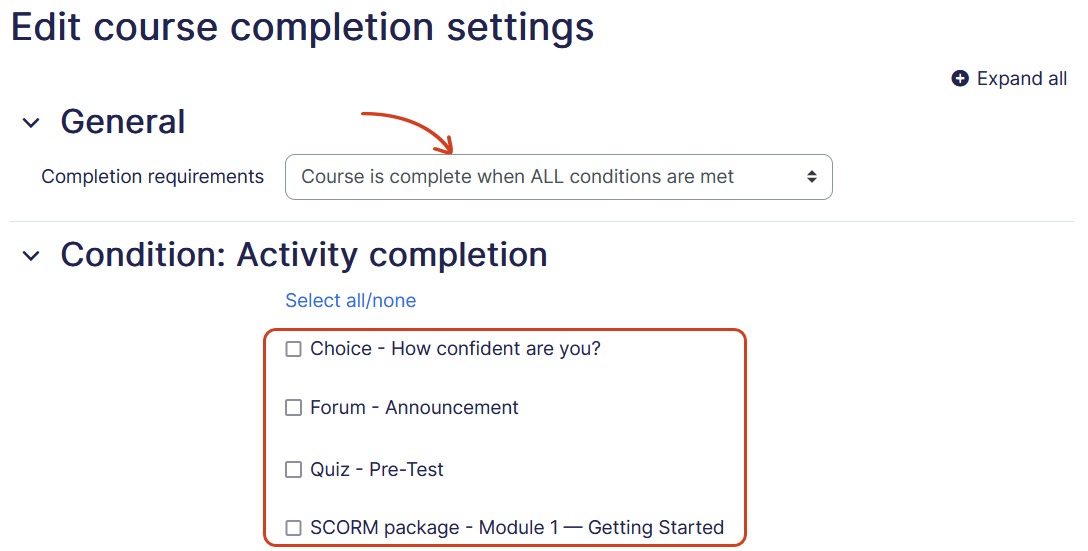
- Once done, click Save and display.