
The following article explores the options of adding users in bulk through a CSV file, this feature is useful:
- If you have to onboard a large number of users.
- If you have a large number of learners who need to be enrolled in specific courses or training programs.
- In scenarios where user information needs to be updated or maintained regularly, bulk upload facilitates this process efficiently.
Preparing CSV file #
Preparing CSV file is the first step for uploading bulk users. It’s extremely important to prepare CSV file carefully and we strongly recommend that you test a file that contains fields you proposed to use with one user before attempting a file upload for the first time.
A sample CSV file with required fields can be downloaded from Upload users page, this file can further customized as per your needs.
Required fields
These are the required user identification fields: username,firstname,lastname,email Validity checks are performed for:
- username can only contain alphabetical lowercase letters, numbers, hypen ‘-‘, underscore ‘_’, period ‘.’, or at-sign ‘@’
- email is in the form: name@example.com
Passwords
The “password” field is optional if the ‘New user password’ setting on the upload screen is set to “Create password if needed and send via email” but is required if the setting is “Field required in file”.
Optional user fields
To provide values other than the default you can include one or more of these optional user fields: institution, department, city, country, lang, timezone, idnumber, phone1, phone2, address, description
Key things to note are:
- country – use the country TWO LETTER CODE, in upper case, e.g. AU,ES,GB,US. These are all UPPER CASE. Using “au” or “es” or “USA” as a country code will result in a database error. If you are having trouble working out the two-letter code for a country, you can consult the list of country names and code elements available on the ISO Website. A common error is to use UK for United Kingdom; it should be GB.
- lang – use the two letter (or extended four letter) code as defined in the language packs, e.g. en, es, en_us, de, in Settings -> Language -> Language packs.
- timezone – Should be in the format as found in the Location settings in terms of Zone/Region, e.g. Australia/Sydney, Asia/Kathmandu, Europe/Madrid, etc. The entry is case sensitive so Europe/London will work but europe/london will not.
Custom profile field names
These are optional and depend on whether you have created any custom profile fields in your site. The name of the header in file is of the form ‘profile_field_xxxxx’ where xxxx is the unique shortname of custom user profile field name as you created it.
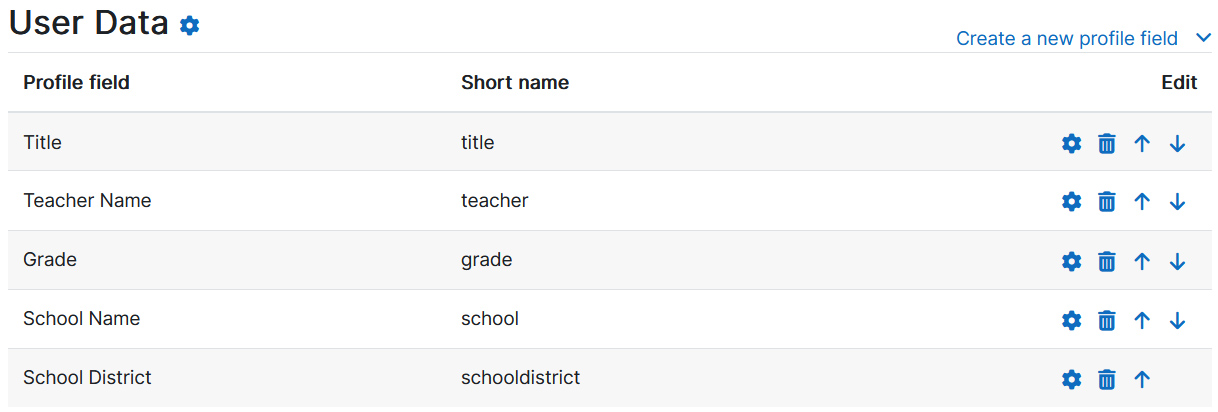
The field name should match the case of the profile field shortname. For example, if short name of Teacher field is teacher, then use a header of profile_field_teacher.
For custom profile fields that are dates, use the ISO standard format YYYY-MM-DD, e.g. 2014-06-19 which will then be properly localized in the interfaced.
Course enrollment data #
If you are uploading roster where you need to create user and enroll them in courses, you can do that as well with Bulk upload feature. For this just add course data like course name, role and group.
- course# is the exact shortname of the course, if present the user will be enrolled in that course. Do not use the fullname of the course or it will generate an error. This field is the ONLY required field for course enrollment. All the others are optional. Course1 is meant for first course, similarly multiple course enrollments can be done with data like course1, course2, etc.
- role# may be used to specify roles directly, using either role short name e.g. student, editingteacher. If the role column is left out, the users will be enroled in the course with the default role, which is normally student.
- group# may be used to assign users to groups in course, using name or id (numeric group names are not supported). NOTE: if the group does not already exist, it will be created.
Example CSV file
Below is a sample CSV file screenshot which is going to upload three students, password is take from CSV file, custom user profile field School and Teacher are defined, and all these students are enrolled in one course.

Uploading CSV file #
Now your CSV file is prepared and proofread for errors, you are good to to upload it.
We strongly recommend that you test a file that contains fields you proposed to use with one user before attempting a file upload for the first time.
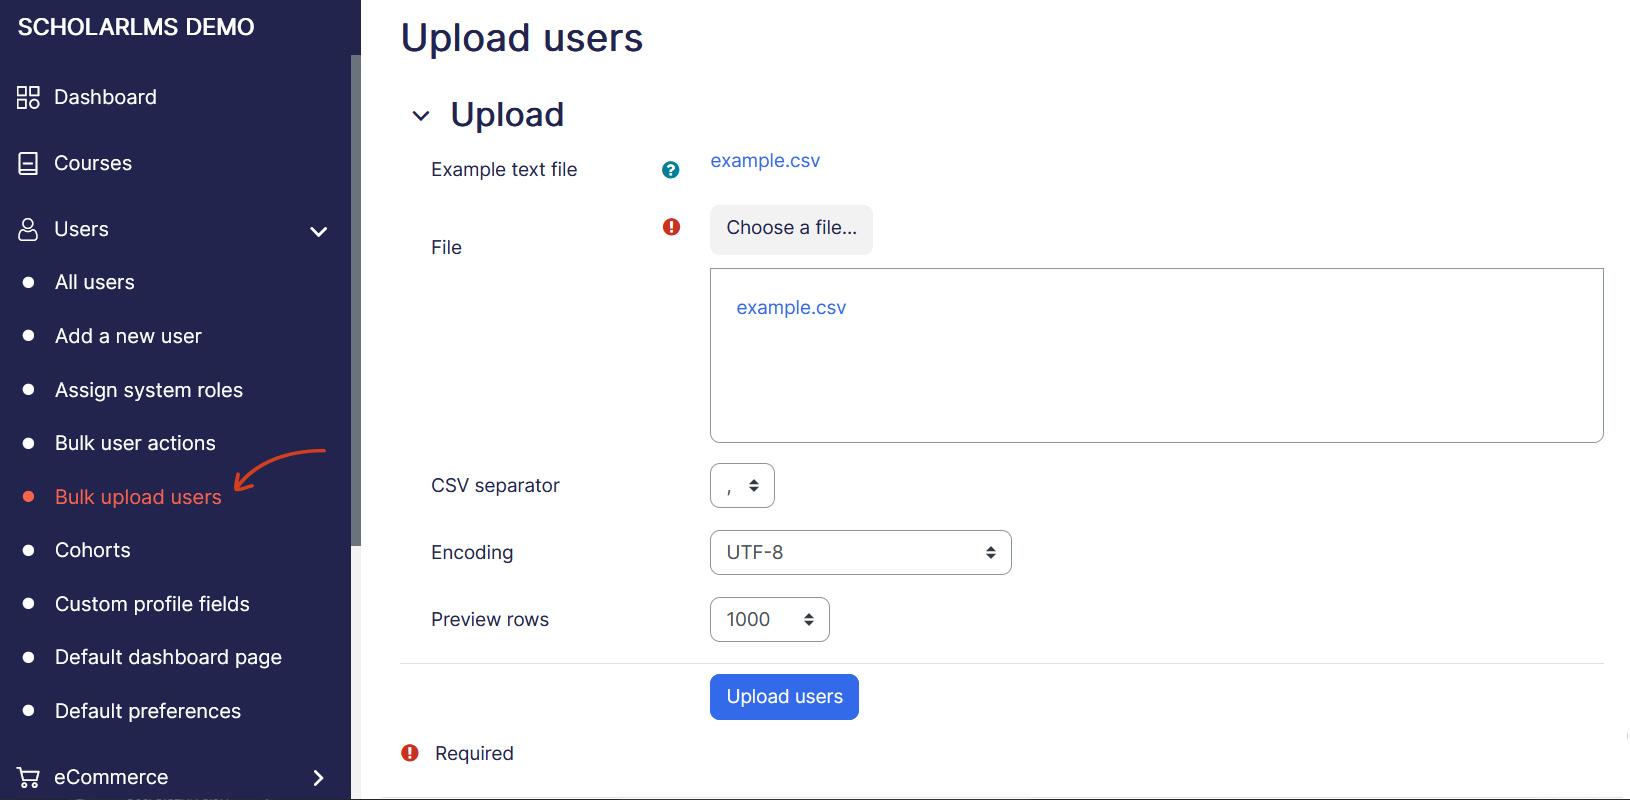
To upload CSV file:
- Navigate to Users->Bulk upload users option from left navigation
- Upload CSV file, from Preview rows dropdown, choose 1000.
- Click on Upload users button
- The next page will provide a preview of the users. The preview page flags an error when it detects an issue with a data row. Check the “Status” column for any errors. Don’t worry; users are not yet uploaded. You can go back, correct the data row, and upload again.
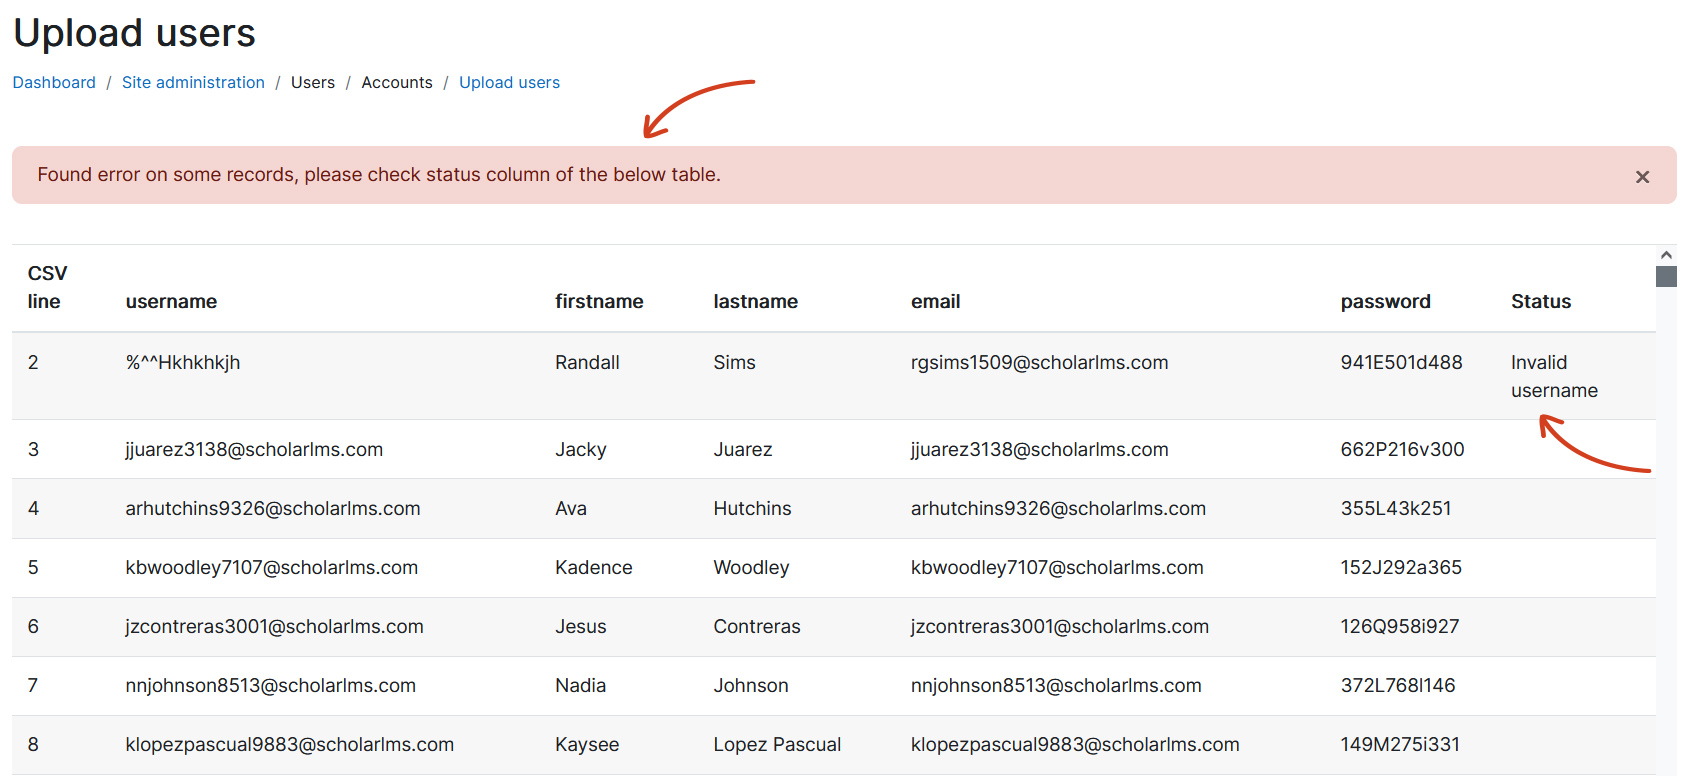
- The preview page also allows you to adjust upload settings to achieve the desired results. Read below to understand how these settings will affect the upload process.
- Select the correct settings for the upload, and then click the Upload users button.
- The next page will show the upload results.
Upload CSV Settings #
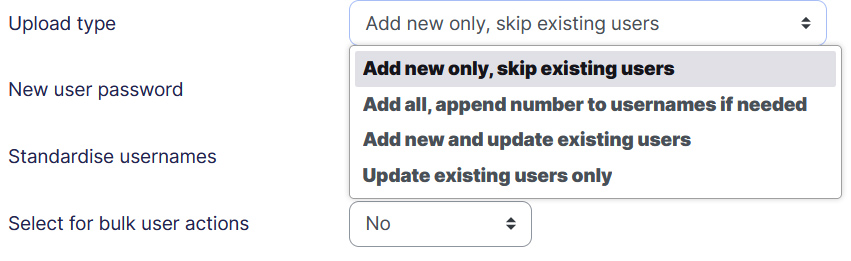
Upload type
The Upload type specifies how to handle existing accounts.
- Add new only, skip existing users — is the default upload type. It creates a new user account for each new record in the uploaded file. If an existing username is found in the uploaded file matches an existing username, that record is skipped. By skipping the existing user account, the data in the existing record is not touched (in contrast to the “Add new and update existing users” option) and a second new user account is not created (in contrast to the “Add all, append number to usernames if needed” option).
- Add all, append number to usernames if needed — creates a new user account for each record in the uploaded file. If an existing user account is found, a new account will be created with a number appended to the username. For example, if a user account for username ‘jsmith’ already exists and a new record in the uploaded file contains a record forusername ‘jsmith’ an additional user account is created with a 1 appended to the username to produce user ‘jsmith1’.
- Add new and update existing users — creates a new user account for each new user in the upload file. If an existing user account with the same username is found, the account information is updated by the data in the uploaded file.
- Update existing users only — ignores any new users found in the upload file and updates the user account if a matching username record is found in the uploaded file.
New user password
When creating a new user account the site can create a new password (if one is not provided) or require a password in the uploaded file.
- Create password if needed and send via email — creates a random default password for each new user account if one is not provided in the uploaded file, and emails the user their user information and new password.
- Field required in file — requires that a password be provided in the uploaded file in order. If a password is not provided, an error is generated and the user account is not created. No notification of this user information or password is sent to the user.
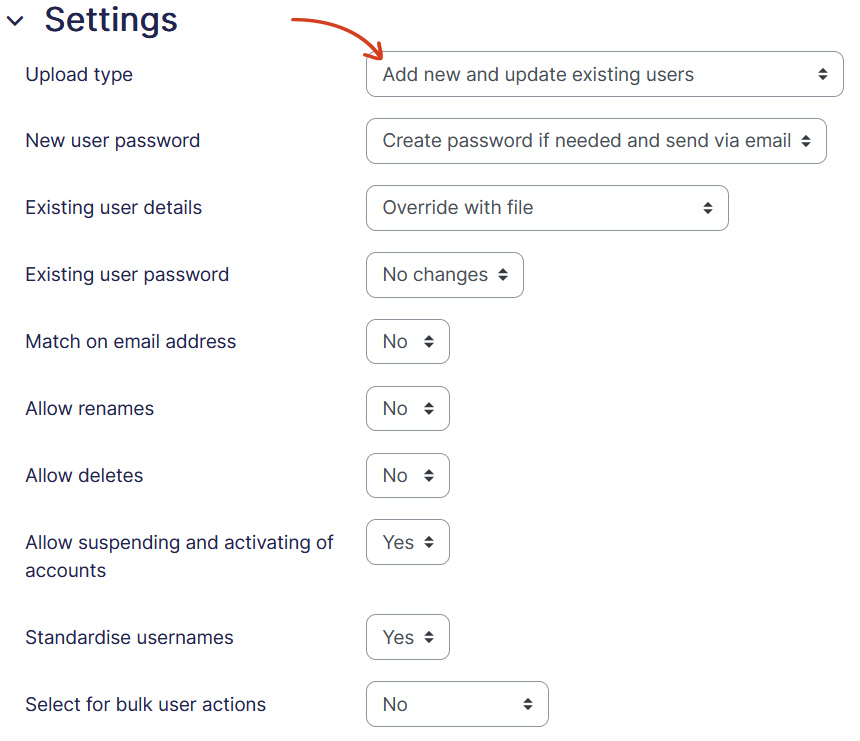
Existing user details
The Existing user details options are only available when the Upload type allows existing user accounts to be updated. It specifies how the site should process user detail information for existing users.
- No changes — ignores user detail data in the uploaded file and leaves the existing user account data unchanged.
- Override with file — overwrites data in the existing user account with the data provided in the uploaded file.
- Override with file and defaults — overwrites data in the existing user account with data provided in the uploaded file and fills in the default values for existing user details when no data is provided in the uploaded file.
- Fill in missing from file and defaults — adds data in the existing user account with data provided in the uploaded file if the field is empty (does not already contain data) and fills in the default values for existing user details when no data is provided in the uploaded file.
Existing user password
The Existing user password option appears when you you have set the “Existing user details” setting to “Overwrite with file”. It specifies how to handle password data for existing user accounts, to change them or leave them as it. This is a bit of insurance to make sure that you really want to mass change user passwords.
- No changes — ignores password field in the uploaded user file and leaves the existing user account password untouched
- Update — overwrites the existing user account password with the password provided in the uploaded file
Match on email address
This option allows you to optionally match users by emails when uploading them if allowaccountssameemail is set to no.
Allow renames
If the uploaded file contains the special oldusername field, it is possible to rename a user from the oldusername to a new username. The default setting is to not allow renames. Keep in mind that renaming a user will require the user to use the new username when logging in.
- No — ignores the oldusername field and leaves the existing user account’s username field unchanged.
- Yes — allows the existing user account’s username to be changed by the data provided in the uploaded file’s username field. The oldusername will be searched for and then updated with the data provided in the username column.
Allow deletes
If the uploaded file contains the deleted special field, it is possible to use the upload file to delete existing user accounts. The default setting is to not allow deletes. Keep in mind that deleting a user account will prevent that user from logging in. As a protection, site administrator user accounts cannot be deleted with this method.
- No — ignores the deleted special field in the uploaded file and leaves the existing user account unchanged
- Yes — allows the existing user account to be deleted when the value of the deleted field is 1.
Allow suspending and activating of accounts
If the uploaded file contains the suspended special field, it is possible to use the upload file to either suspend or make active (unsuspend) existing user accounts. The default setting is to allow suspending/activating of existing user accounts. Keep in mind that suspending an existing user account will prevent that user from logging in.
- Yes — allows the existing user account to be suspended when the value of the suspended field is 1.
- No — ignores the suspended special field in the uploaded file and leaves the existing user account status unchanged.
Standardise usernames
Standardise usernames is used by default to convert the username to all lower case and to strip out illegal characters. It is possible to not standardise the usernames; however, doing so is not recommended.
- Yes — standardises usernames found in the uploaded file before updating existing or creating new user accounts so that the username contains only lowercase letters and numbers.
- No — skips standardising usernames found in the uploaded file so that the newly created or updated usernames will be exactly as they are in the uploaded file (not recommended).
Default values
From this section, you can provide default user values for some fields not included in the uploaded file.